
Collect Now
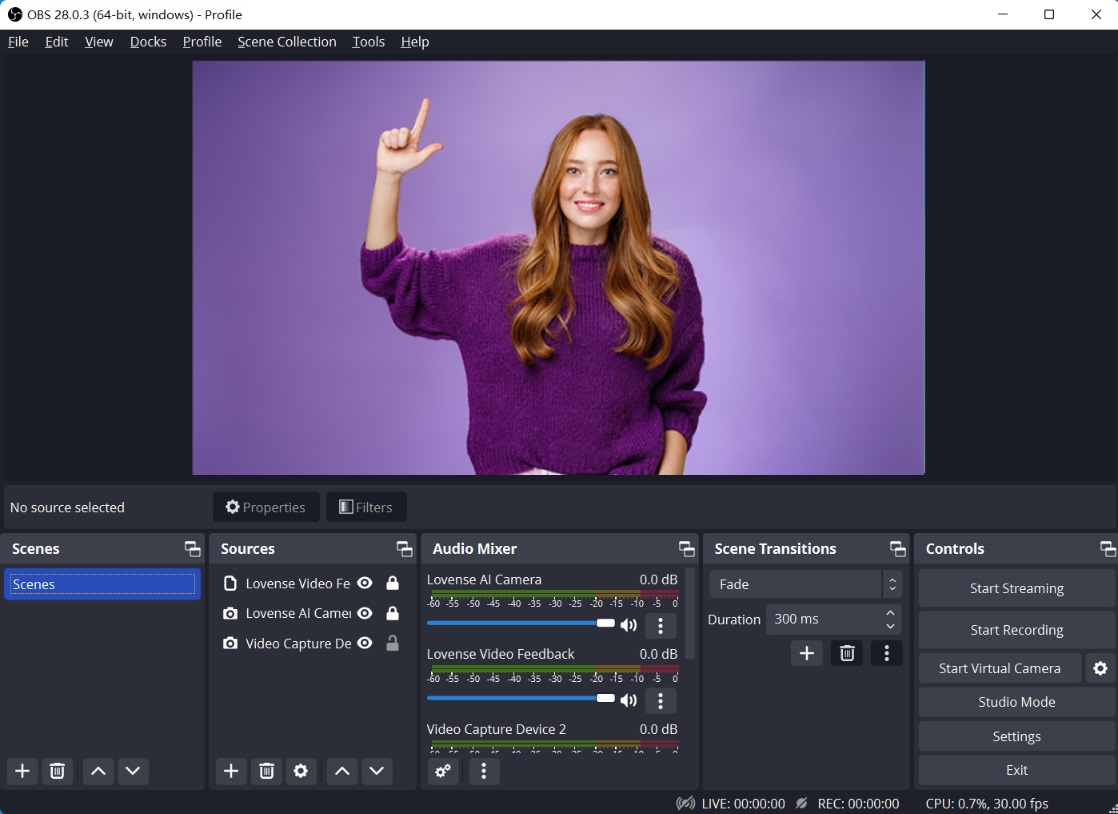
Lovense Sex Toys
The Leader in
Connected Pleasure
For Her


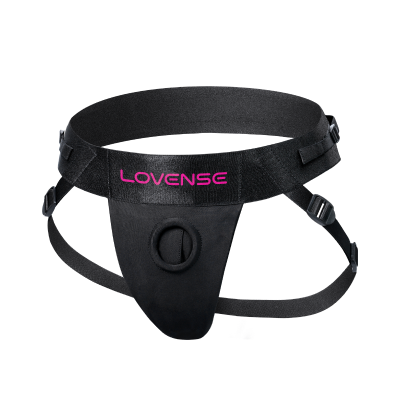


For Him


For Unisex
For Couples


Camming
Apps
Possibilities
If you have any questions
 Al bot
 Contact Us
Customer Favorites
Popular Searches
Popular Products
Help Us Improve!
When browsing our dildo selection, do you see the type(s) you're interested in?

I see dildo machines

I see vibrating dildos

I see thrusting dildos

I see suction cup dildos

I see dual-stimulation/rabbit dildos

I don't see the type I'm looking for!
Help Us Improve!
Please tell us more about the type of dildo you're looking for.
Thank you for your response
Leave your email so we can follow up on your feedback.
We respect your privacy and will only use your info for this survey.

World’s first rotating bead rabbit

Targeted G-spot tapping with lifelike heating

Iconic rabbit with rotating motion
Swirling waves up and down the entire shaft
Body-like warmth during penetration
Deep spinning G-spot massage
Deep spinning G-spot massage
Rhythmic tapping directly engaging G-spot
*7,500/minDeep spinning G-spot massage
Familiar deep rumbling on clit
Familiar deep rumbling on clit
Familiar deep rumbling on clit

Video Guides
Set up the Lovense Webcam using a cam site
Set up the Lovense Webcam using OBS
Set up the Lovense Webcam using Lovense Cam Extension + OBS
Set up the Lovense Webcam using Stream Master
Written Guides
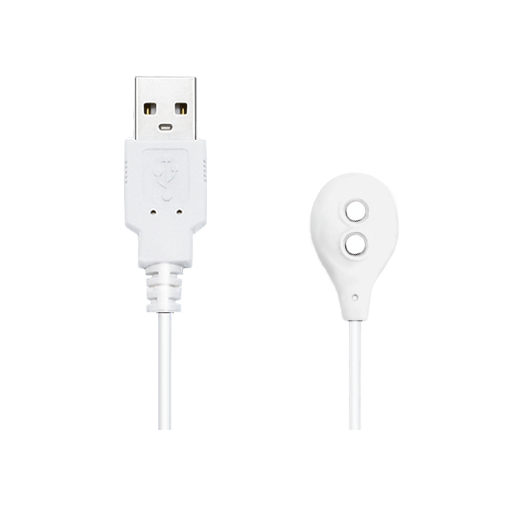
Hardware Setup
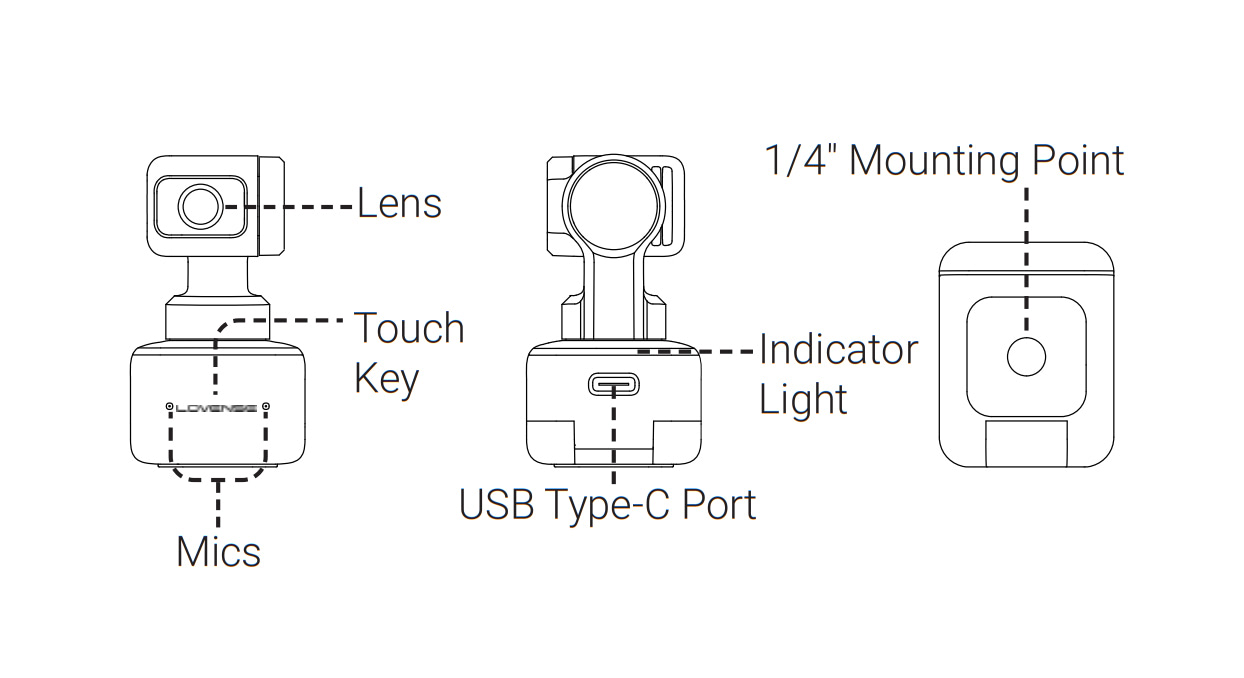
Names of parts
Setting up Lovense Webcam
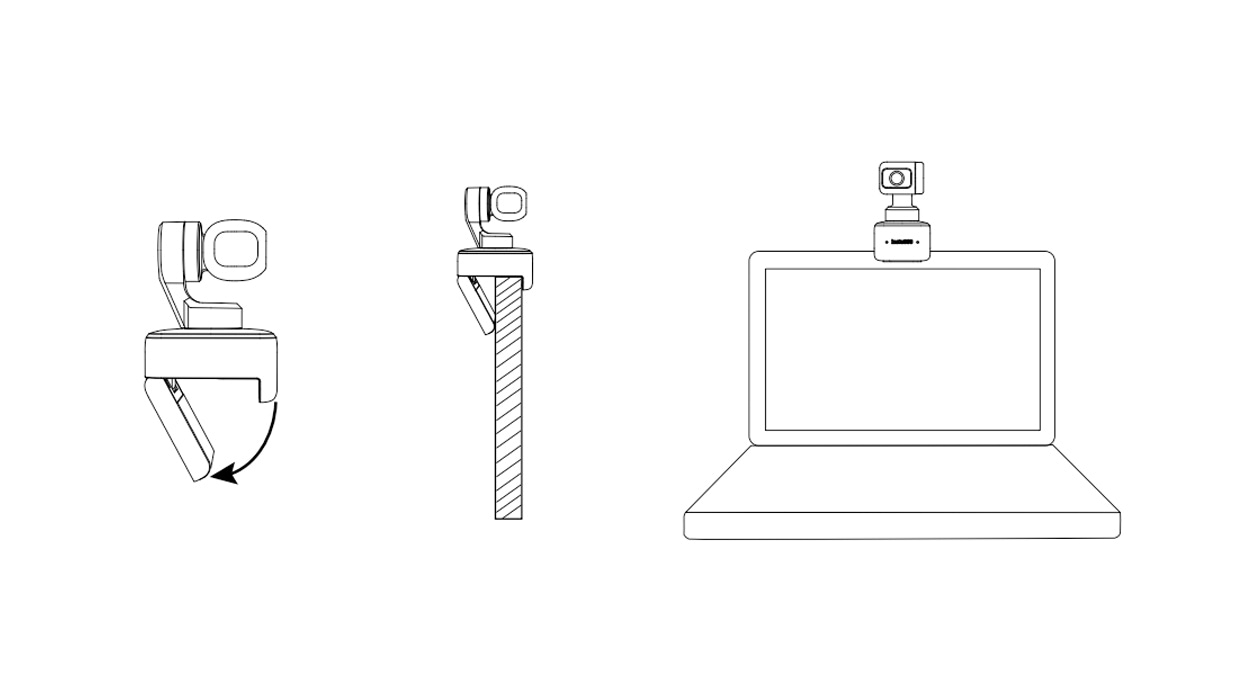
Placement
Lovense Webcam can be set up in a number of ways. Its built-in clip design allows it to be clipped directly onto a computer screen (as shown below) or placed on a flat surface. The base has a 1/4" screw hole for use with a stand/tripod.
Connecting to Lovense Webcam
Important:
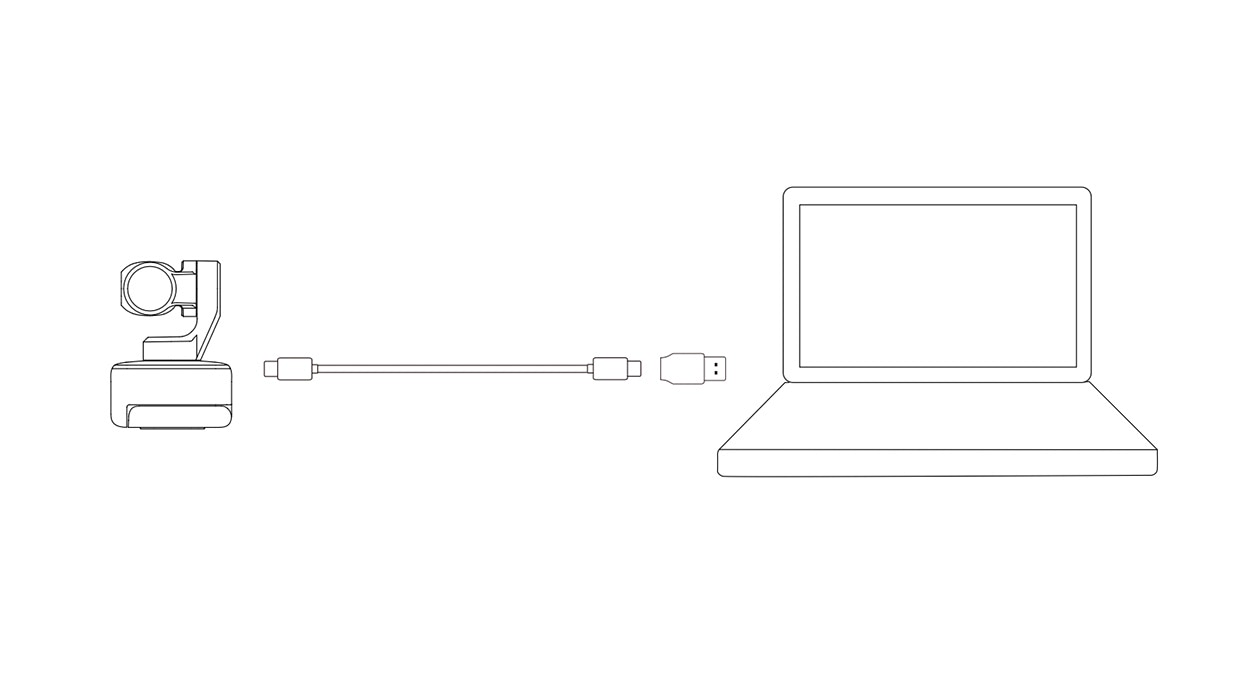
1) To avoid issues due to insufficient power supply, please connect Lovense Webcam directly to a computer or USB hub with an independent power supply.
2) To avoid compatibility issues, please use the included USB cable to connect Lovense Webcam to your computer.
Lovense Webcam is compatible with both Windows and macOS. Please use the USB cable to connect it to your computer's USB port. Once connected, the blue light on the camera will flash. When it is fully powered, the blue light will be continuously illuminated. It will automatically power off when unplugged.
Software Setup
You can easily set up a Lovense Webcam with or without Lovense software.
Without Lovense Software
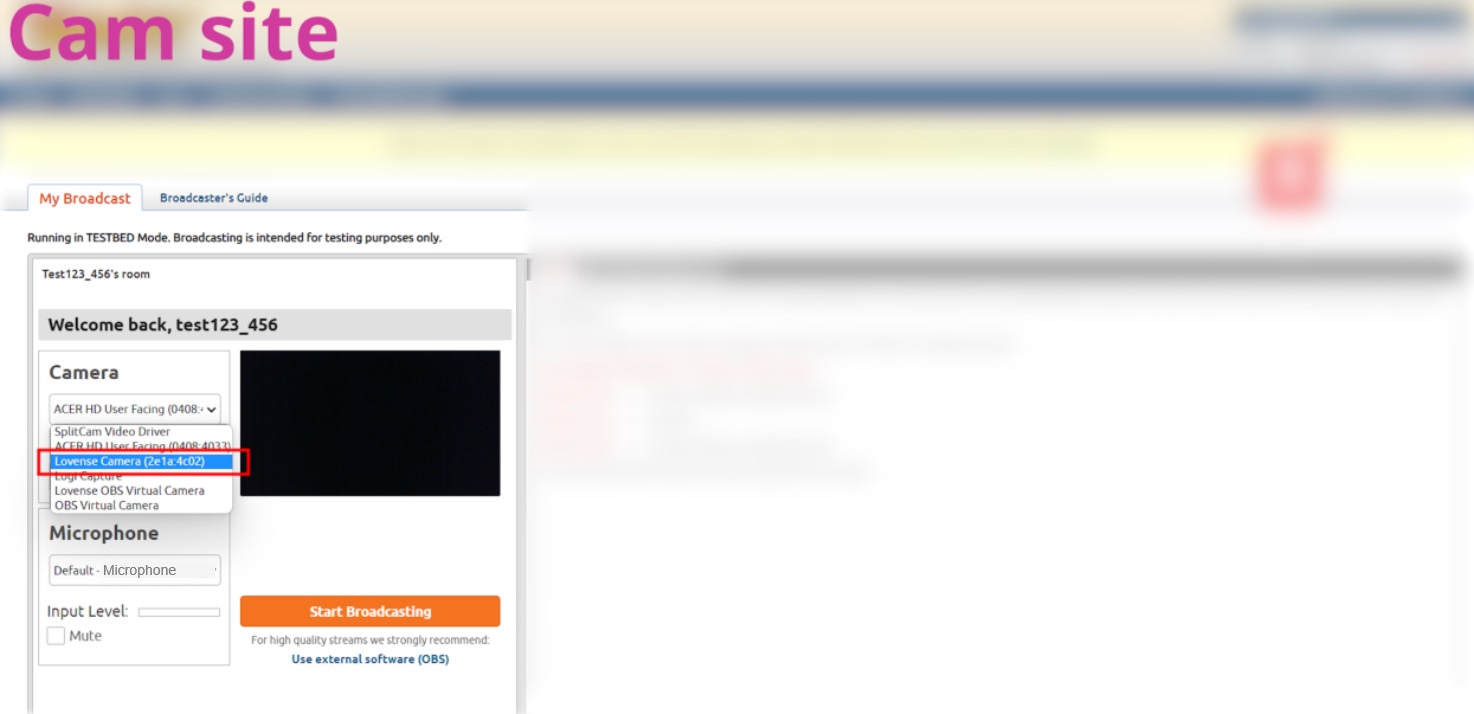
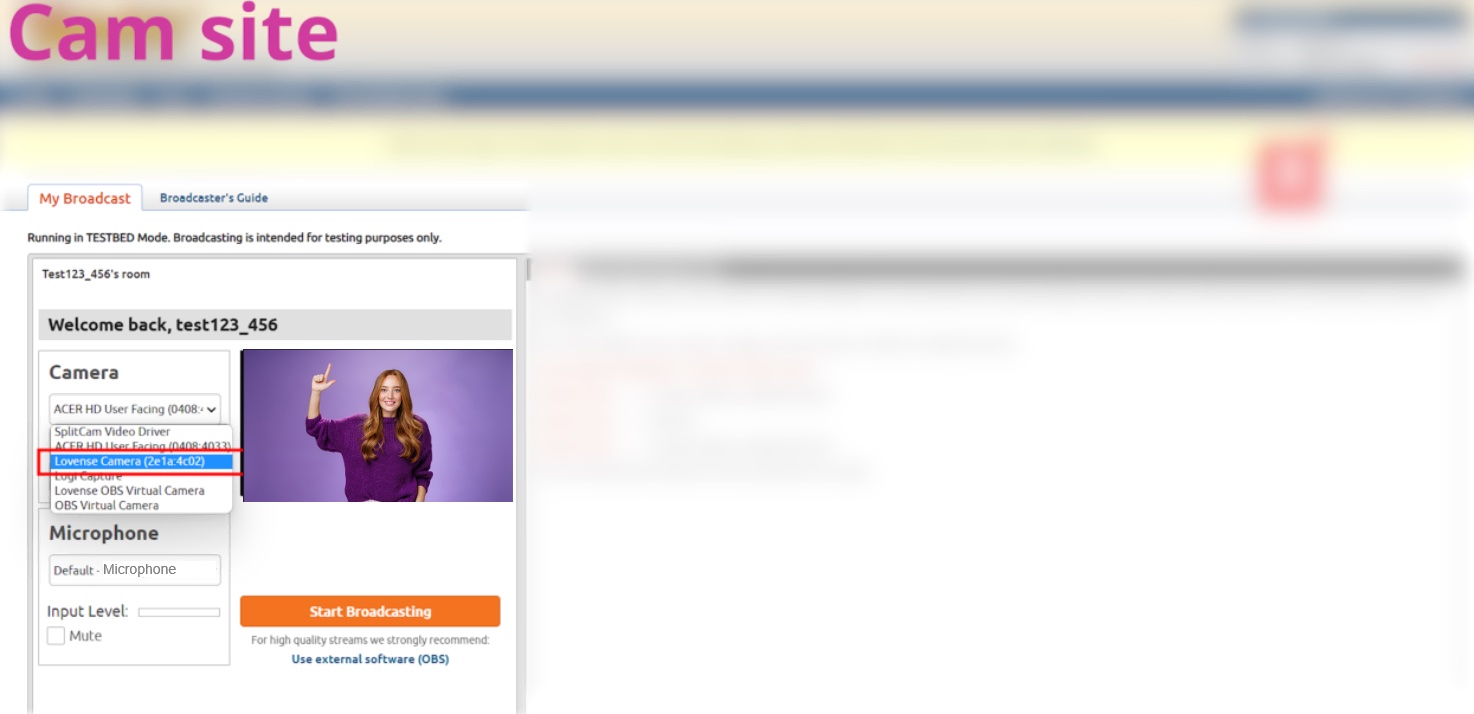
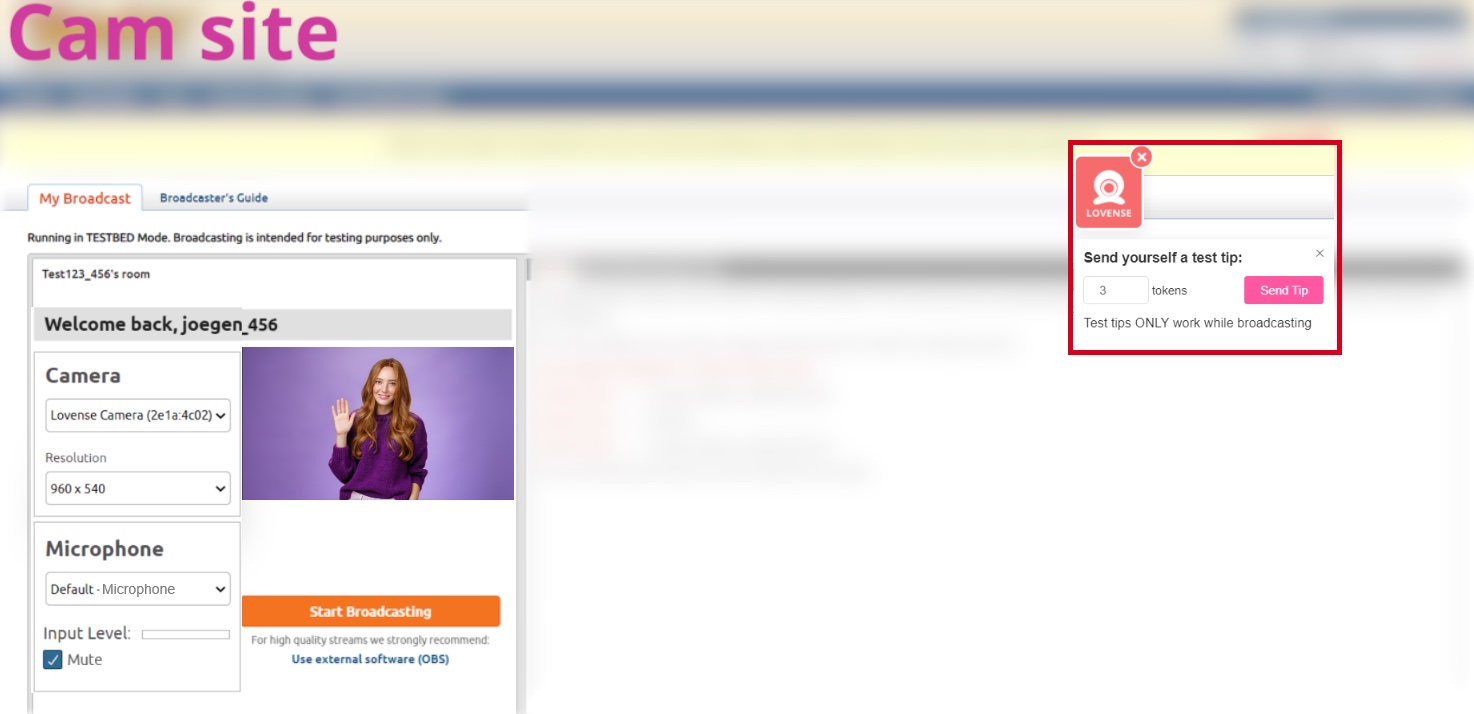
a) When using a cam site
1. Connect the webcam to your Windows PC or Mac. Once connected, the blue light on the camera will flash. When it is fully powered, the blue light will be continuously illuminated.
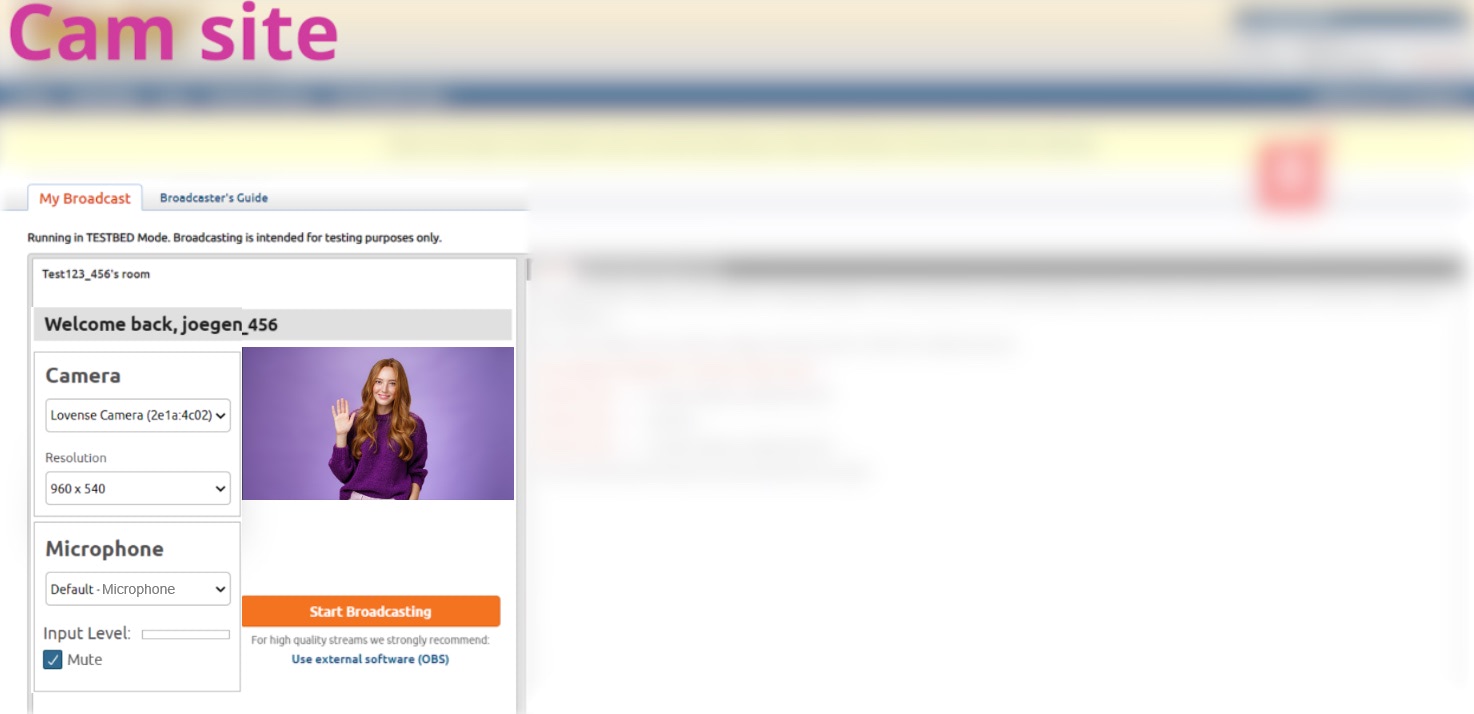
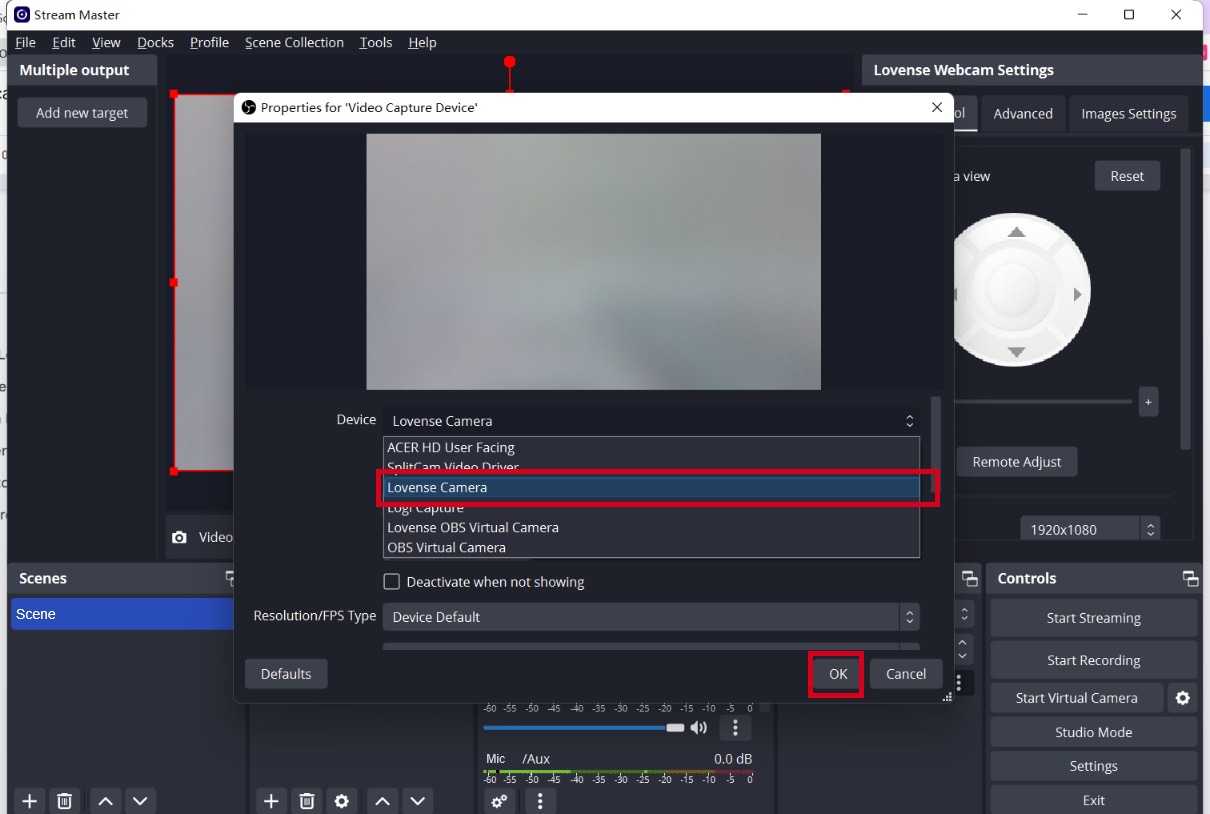
2. Go to your broadcasting site and select Lovense Camera as your camera source.
3. Enable Auto Tracking if needed.
To enable "Auto Tracking":
Show your face and palm to the camera.
When the webcam light flashes, the "Auto Tracking" feature is enabled.
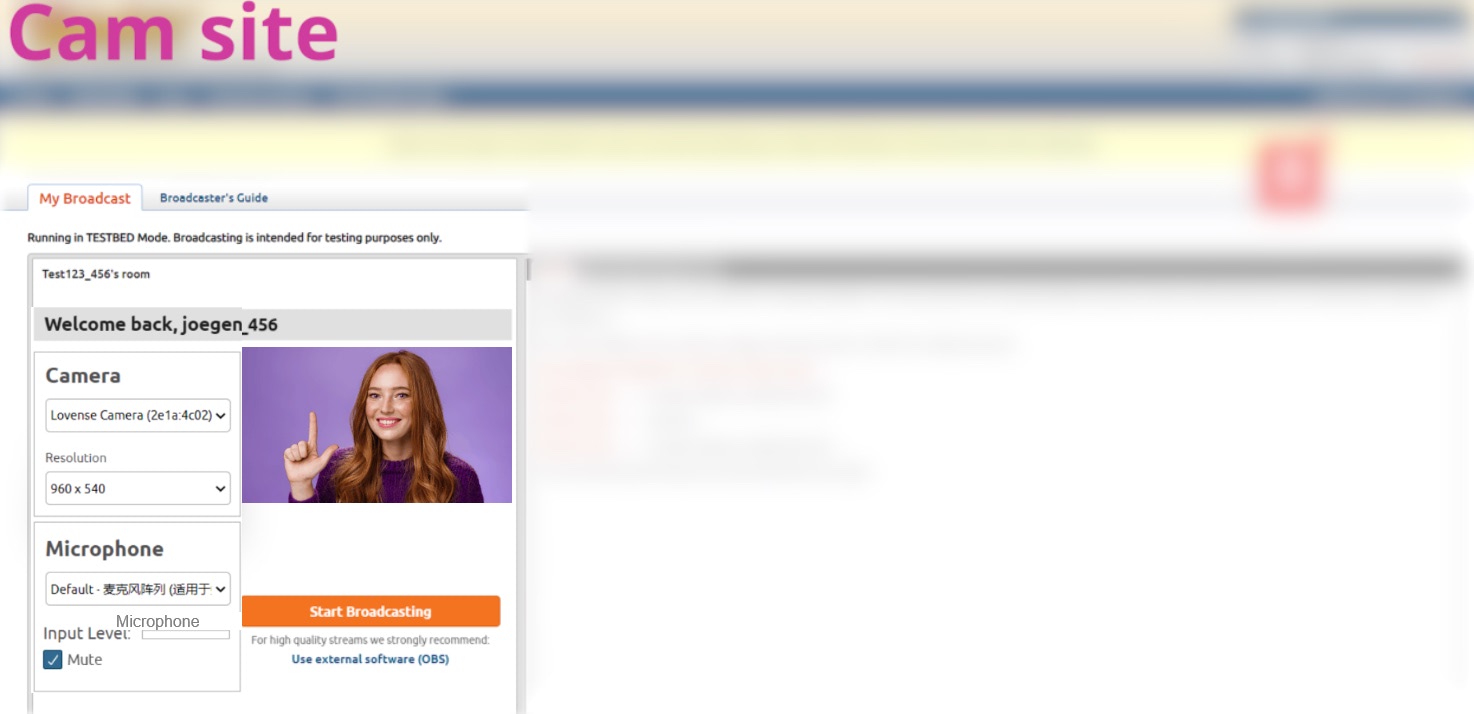
To disable "Auto Tracking":
Show the palm gesture again to disable “Auto Tracking".
4. Zoom in and out - L gesture.
To zoom in:
To zoom out:
b) When using OBS
1. Connect the webcam to your Windows PC or Mac. Once connected, the blue light on the camera will flash. When it is fully powered, the blue light will be continuously illuminated.
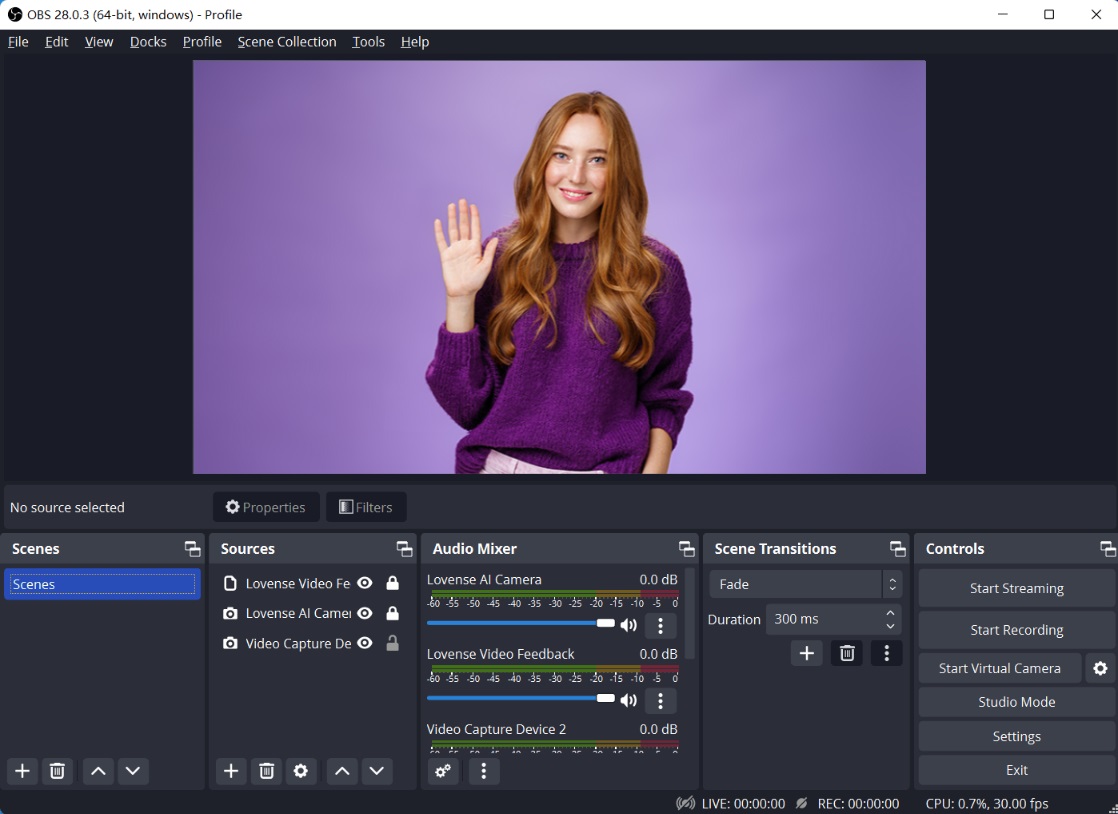
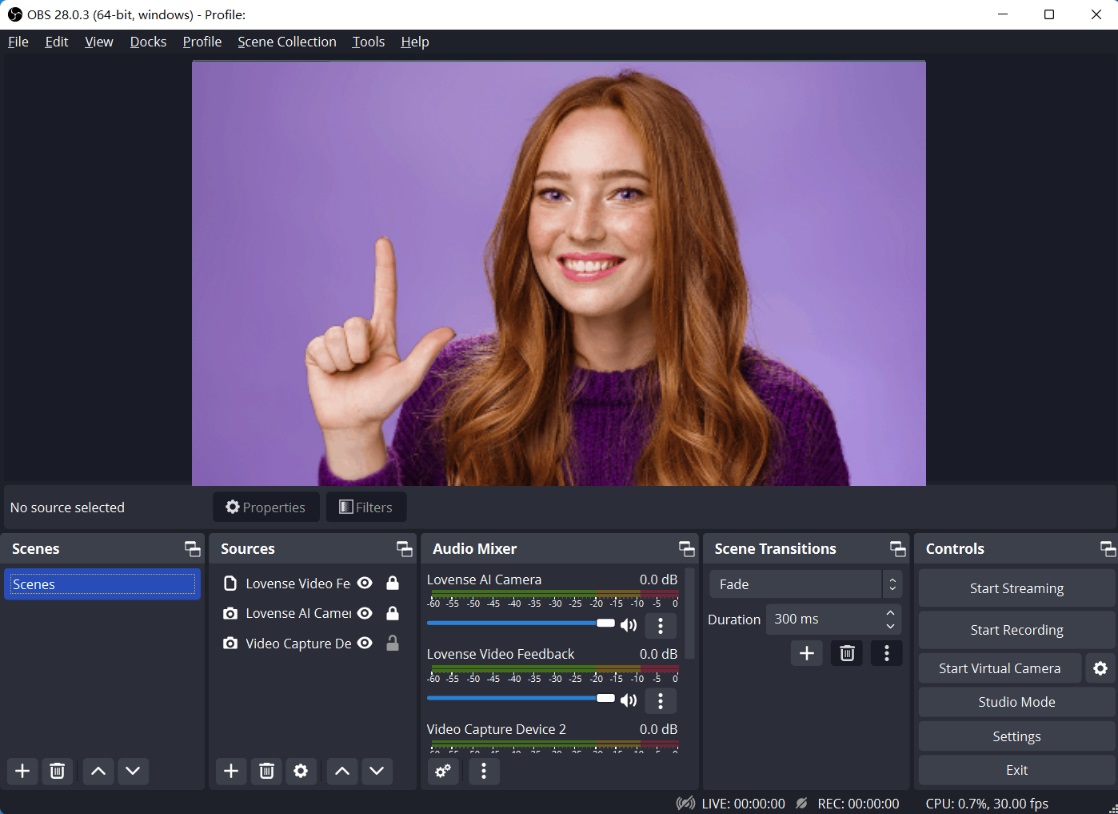
2. Open the OBS.

3. Select Lovense Camera as the video capture device.


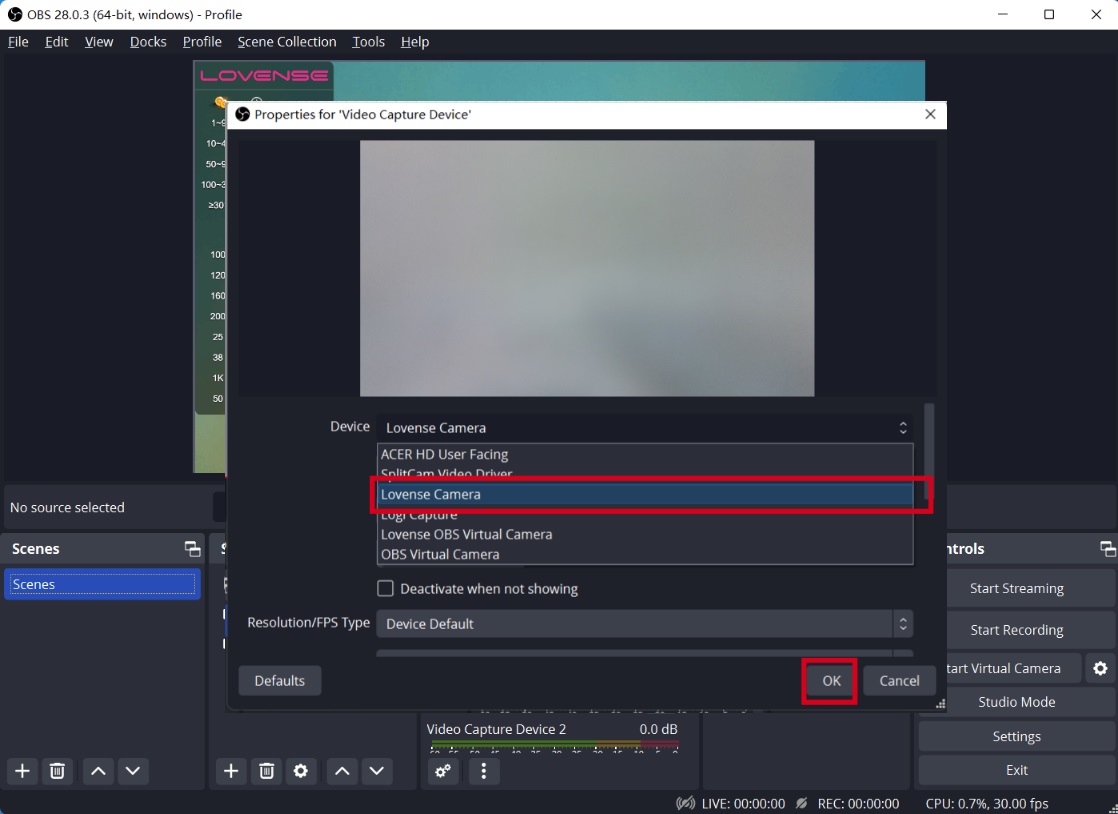
4. Enable Auto tracking if needed.
To enable "Auto Tracking":
Show your face and palm to the camera.
When the webcam light flashes, the "Auto Tracking" feature is enabled.
To disable "Auto Tracking":
Show the Palm Gesture again to disable “Auto Tracking".
5. Zoom in and out - L gesture.
To zoom in:
To zoom out:


With Lovense Software
a) For Lovense Cam Extension + OBS Users
Set up

Adjust your angles
Gimbal control
Control the view of camera
Zoom in and out
Zoom in and out - L gesture
To zoom in:
To zoom out:
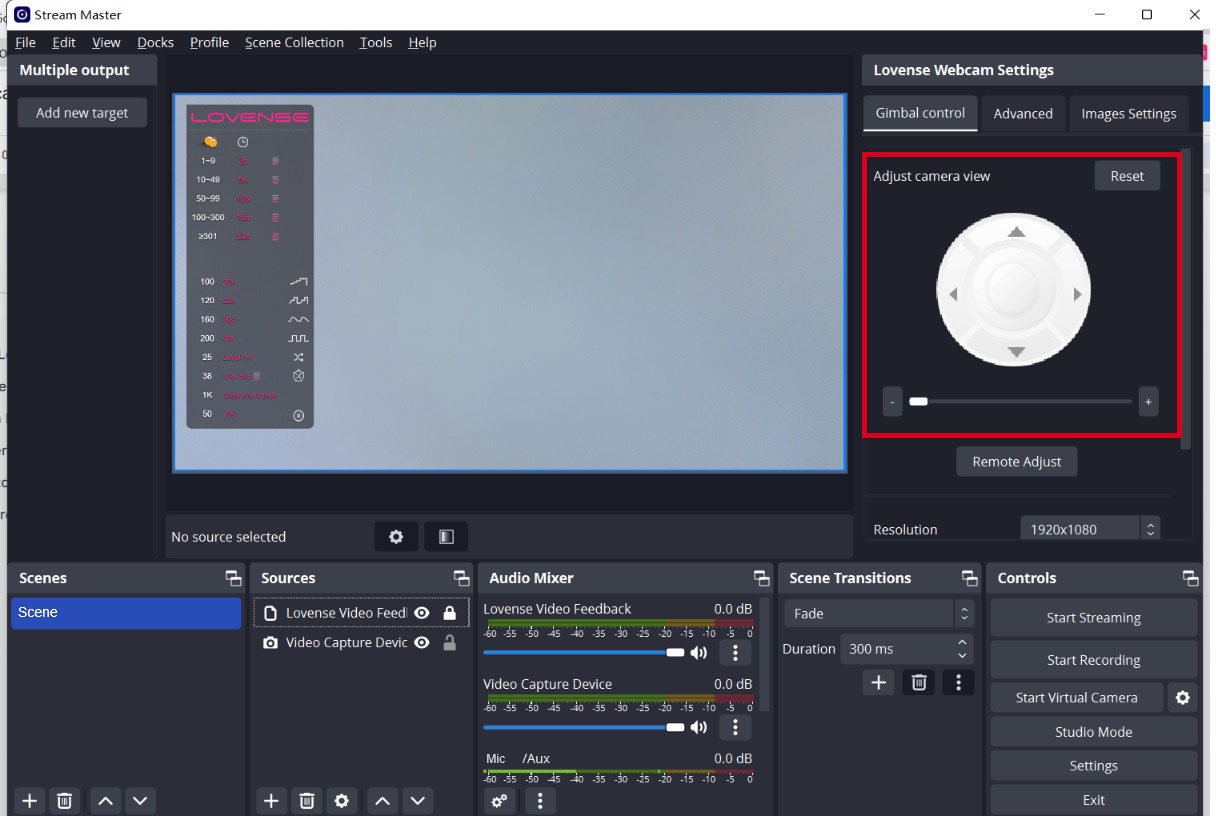
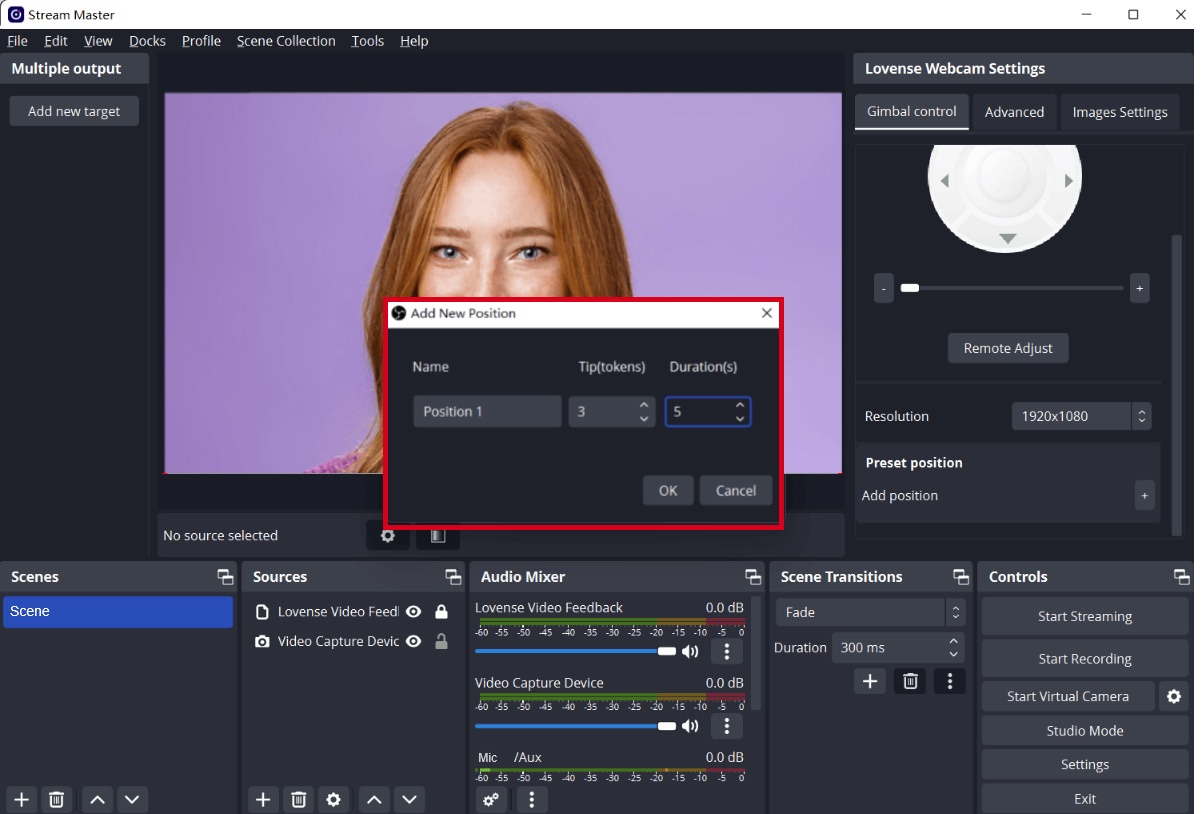
Set up tip-activated feature
Models can set up preset positions in OBS for different body parts and the tip amount and duration for each body part. Once tipped, the camera will zoom in on that body part.
Adjust the camera view.
Set a fixed camera view.

Add a new body part position you would like to be zoomed in on.

Set tip amount and duration for each body part being filmed.
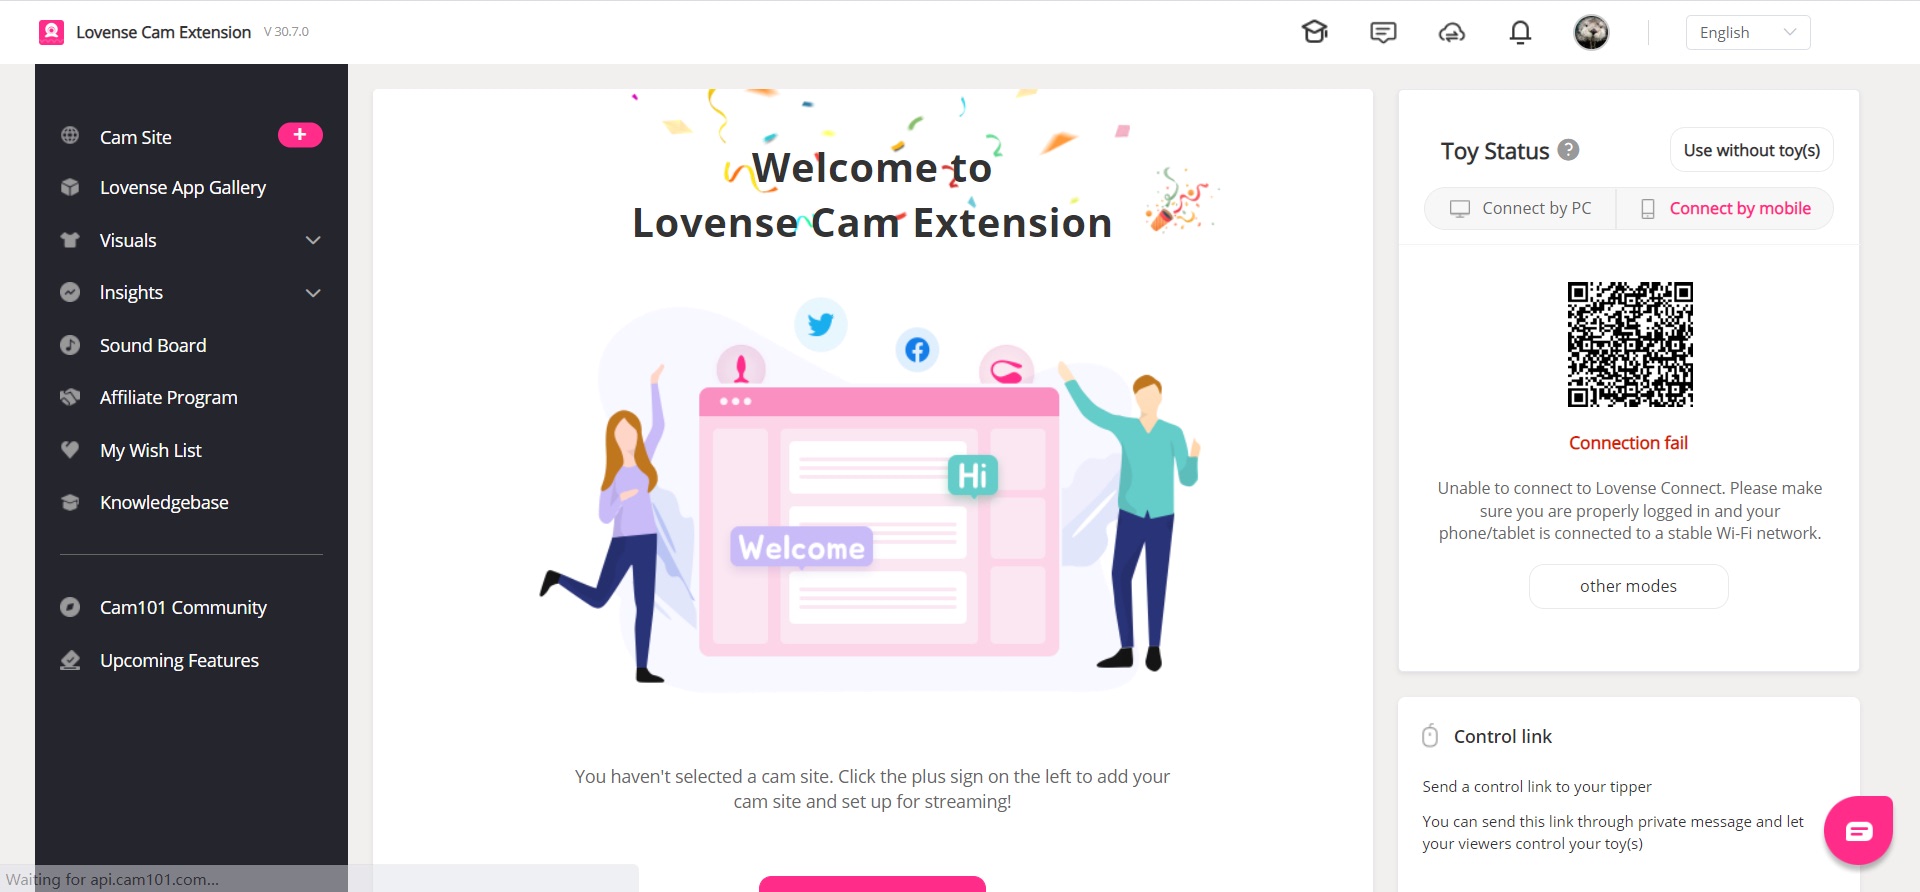
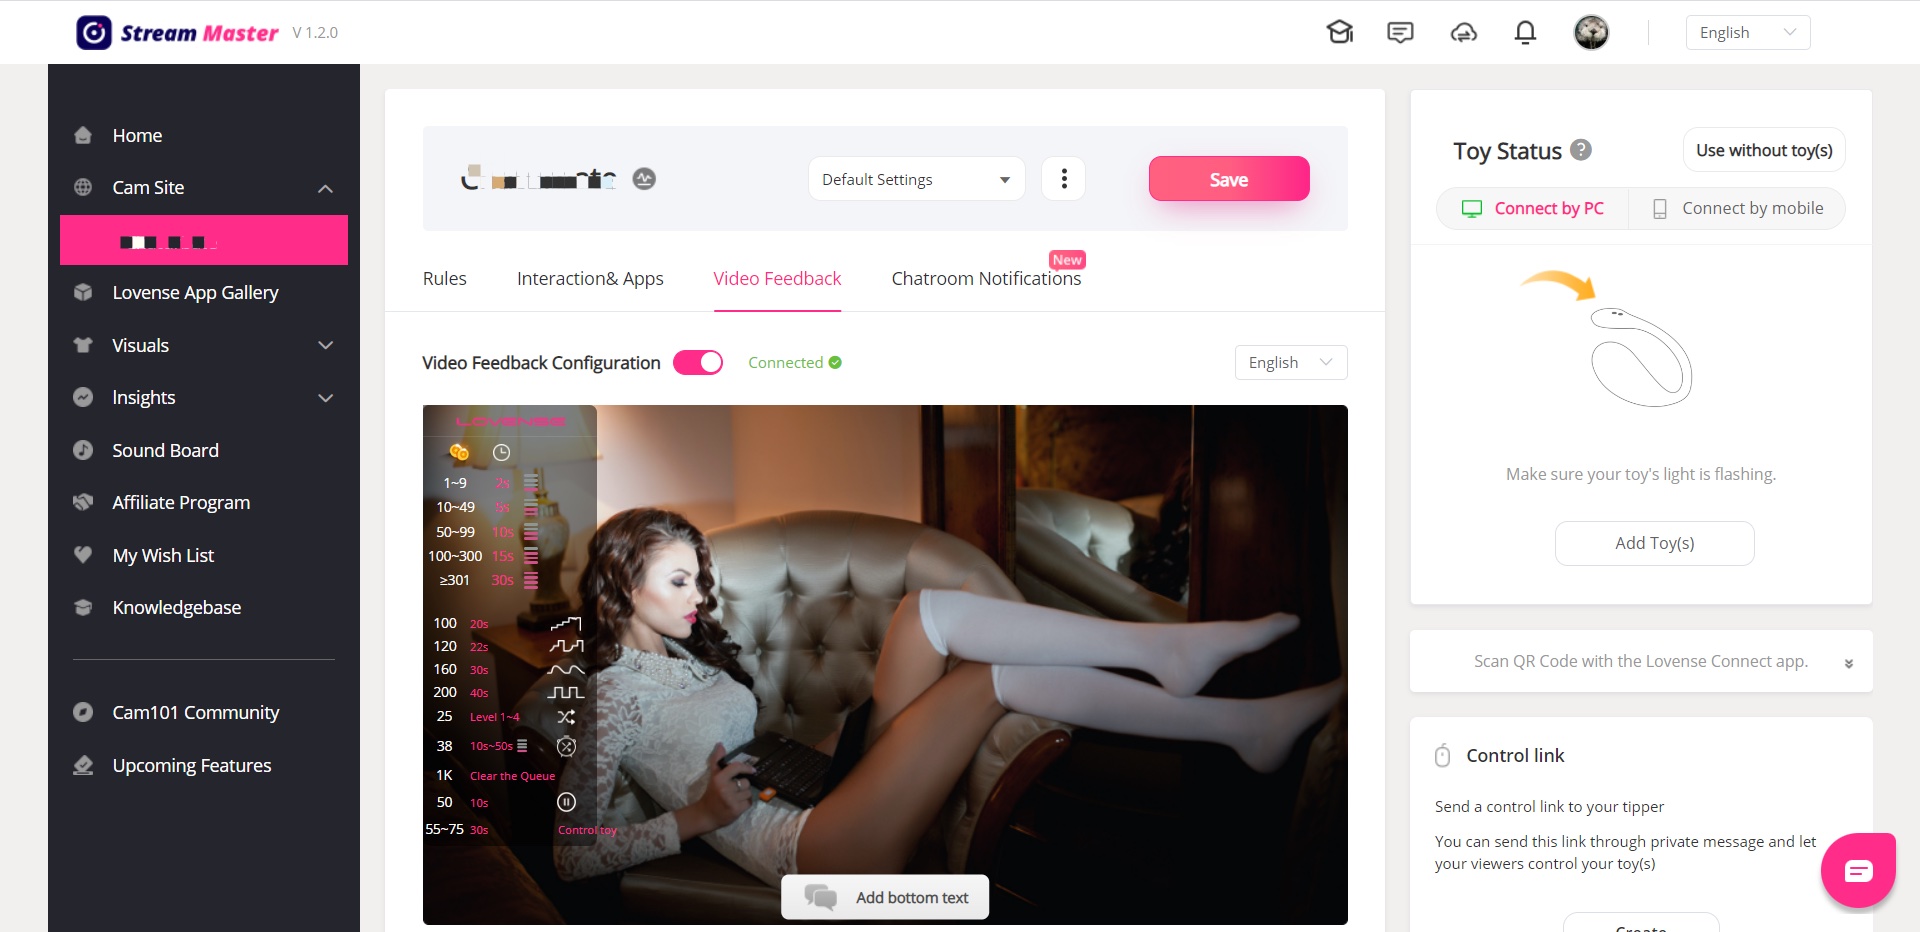
Log into Lovense Cam Extension
Go to Lovense Cam Extension and:
a) Log in.
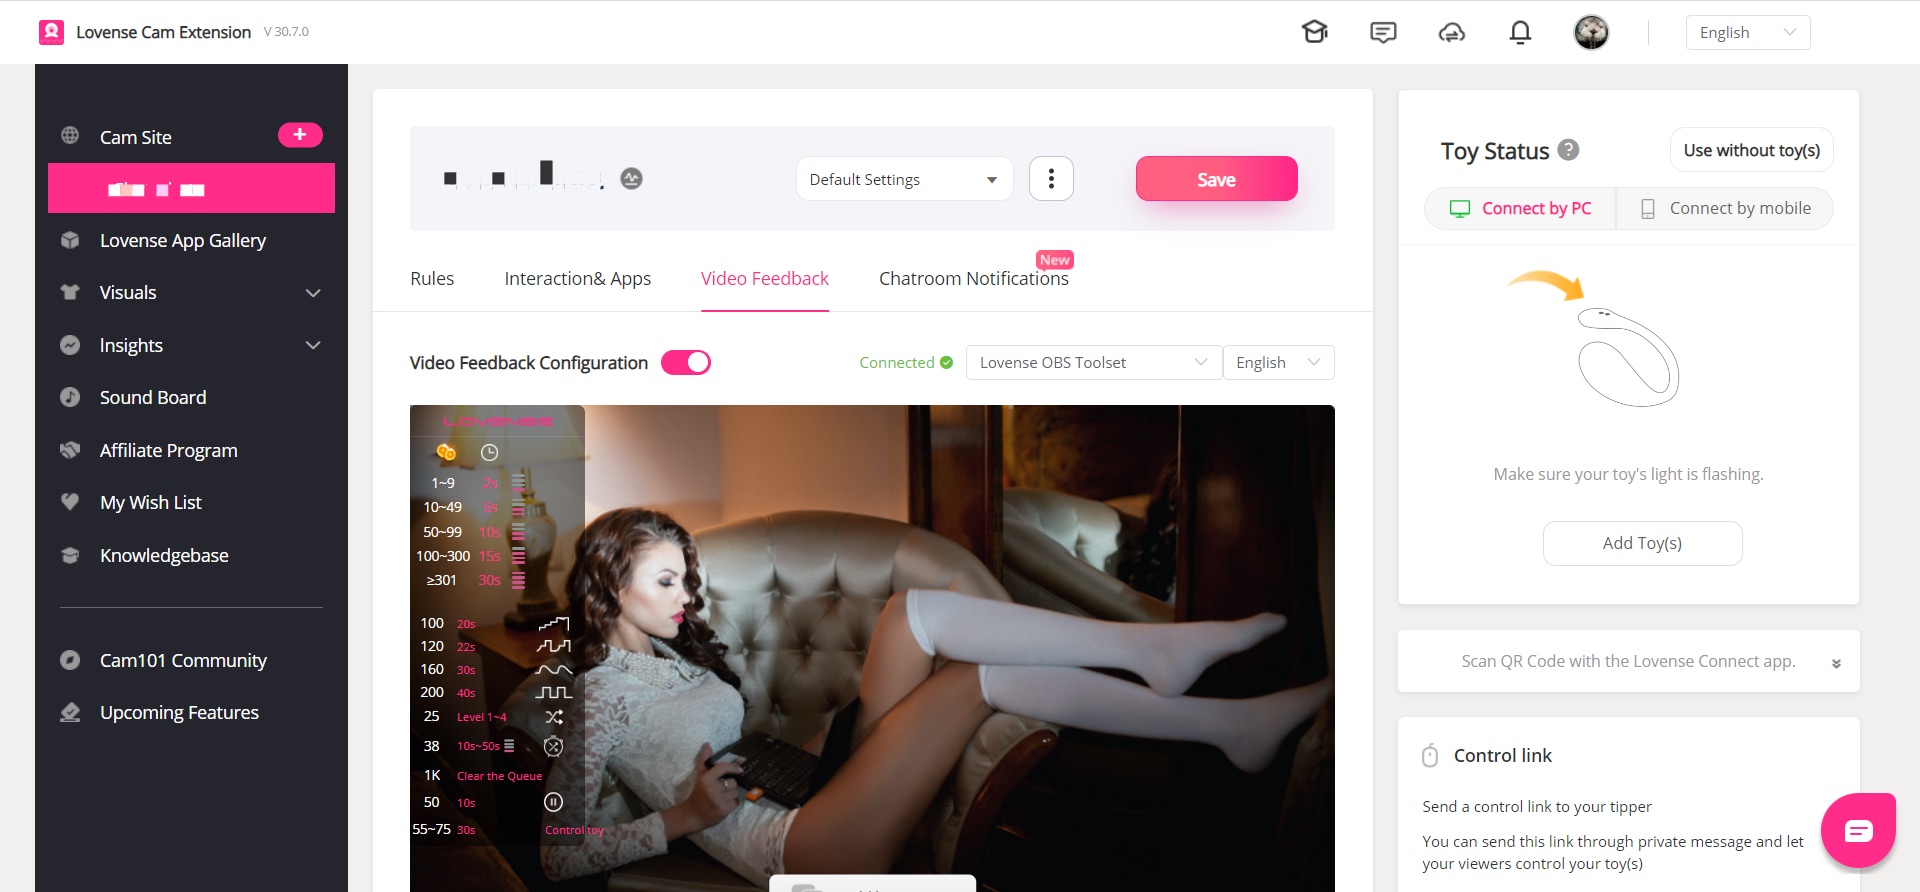
a) Enable Video Feedback Configuration.
Send a test tip
Go to the broadcasting page and send a test tip in Lovense Widget to test if the preset position works.

The Lovense Webcam will switch to the preset position.

The view will change to its original position after the test tip duration is over.
Enable Auto tracking if needed
Button control
Stand up, walk away from the camera, walk to the left and right.
Enable "Auto tracking" with gesture, disable "Auto tracking" with gesture.

Enable AI Zoom and make different poses
Your body will always stay in shot.
Whole body: Stand up and show your whole body in front of the camera.
Half-body: Sit on the chair and show your half body.
Head: Sit in front of the camera and make a cute expression.
Note: Whole body only works if there is enough distance between you and the camera.

You are now ready to go live!
You may want to use Gesture Control during the show
To enable "Auto Tracking":
Show your face and palm to the camera.
When the webcam light flashes, the "Auto Tracking" feature is enabled.
To disable "Auto Tracking":
Show the palm gesture again to disable “Auto Tracking".

Optional features
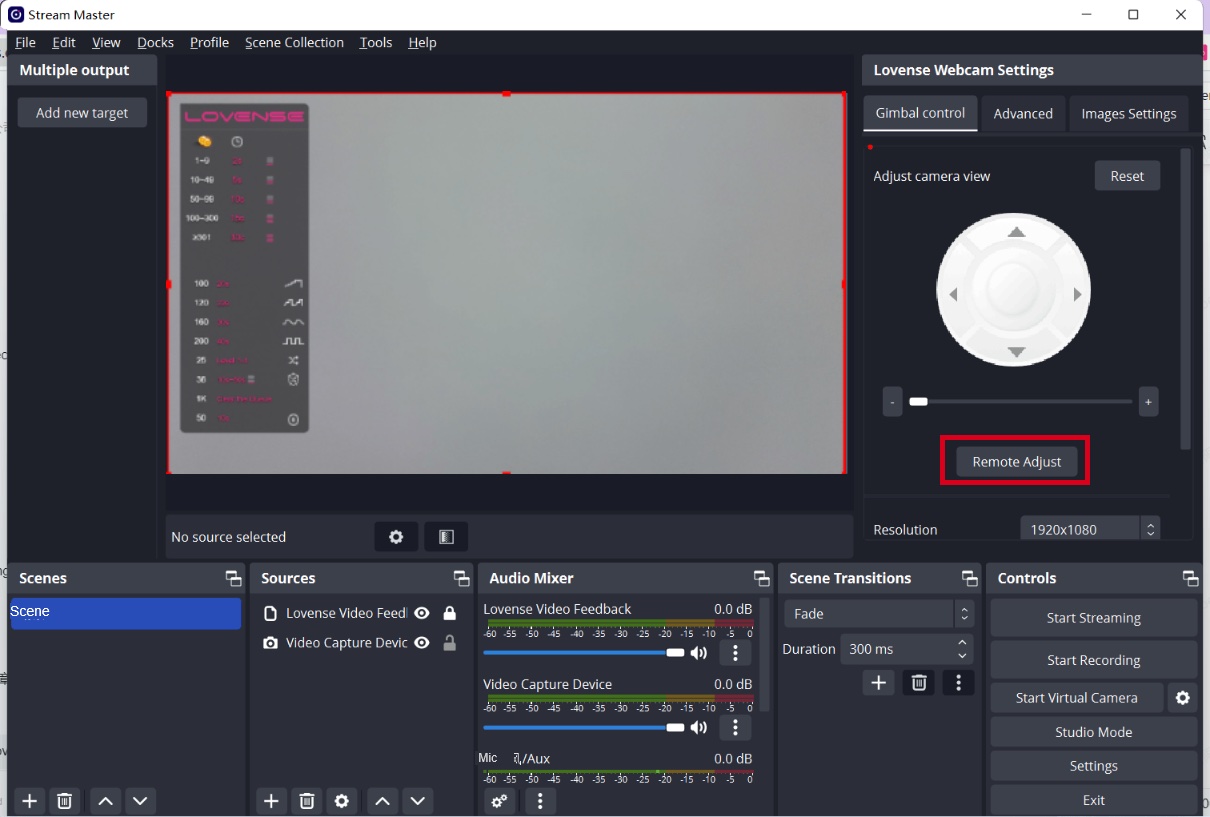
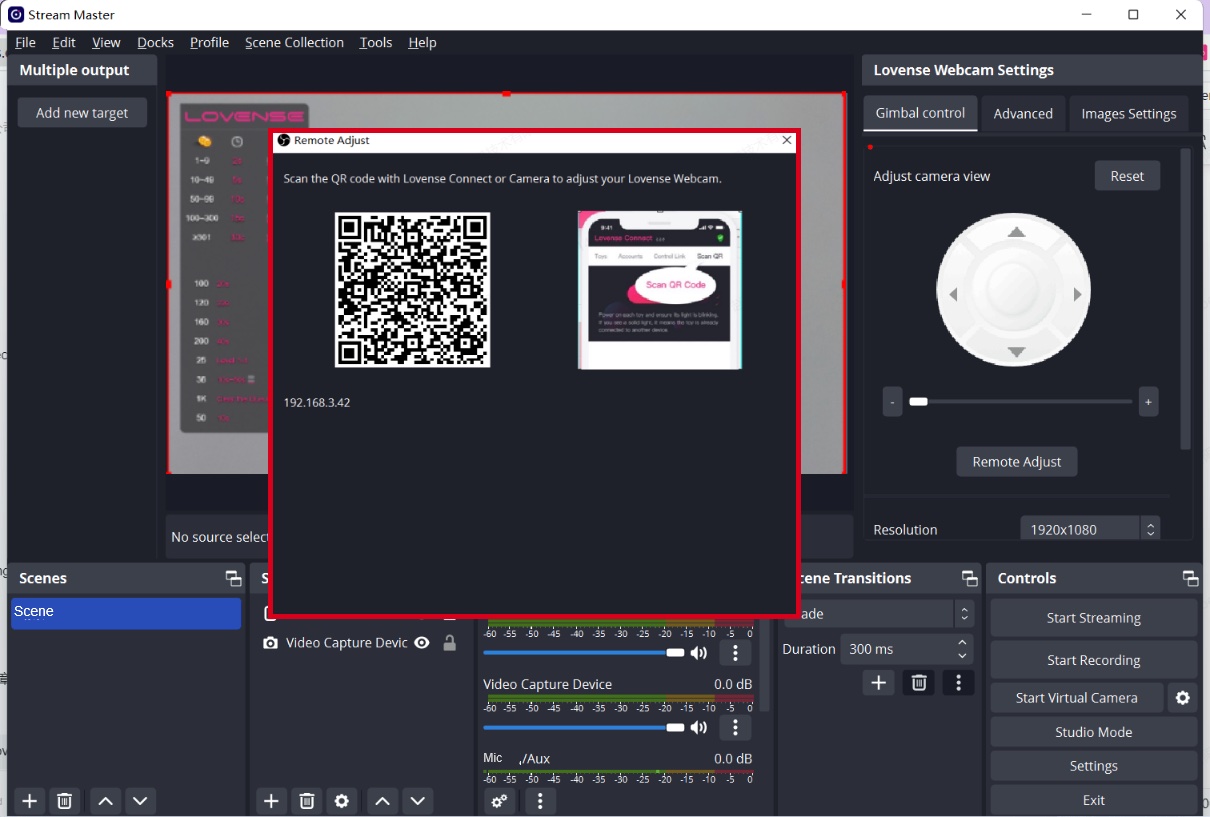
Remote adjust
If you move further away from your computer while broadcasting, you can control the Lovense Webcam using the "Remote Adjust" feature on your phone.
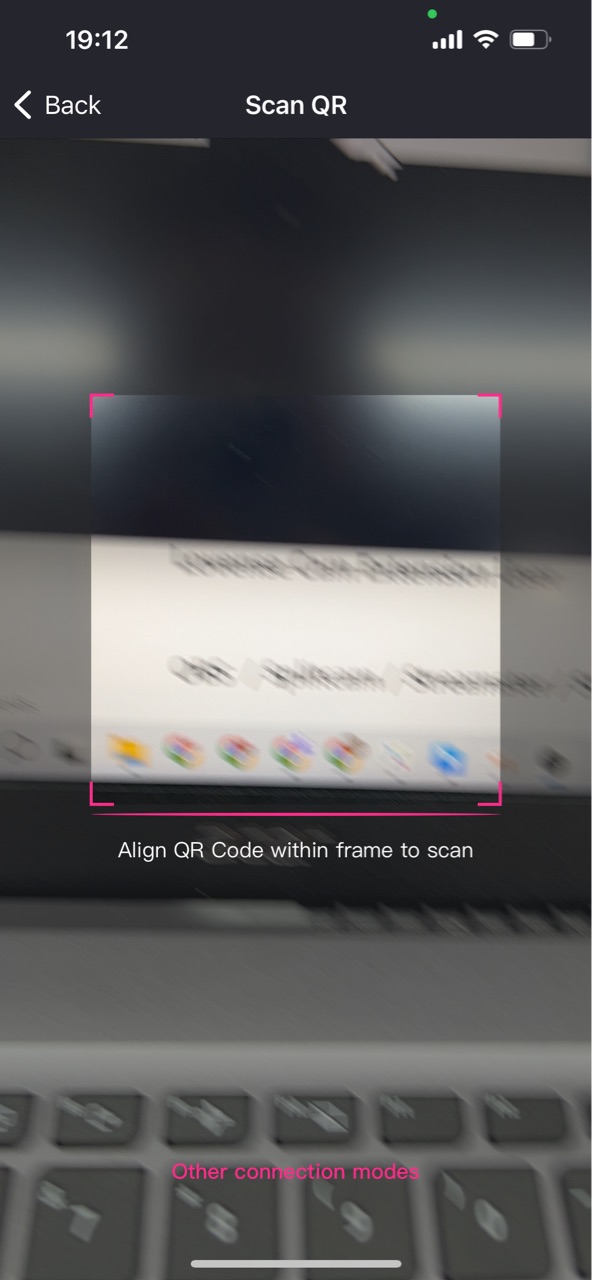
Open QR code of "Remote Adjust"
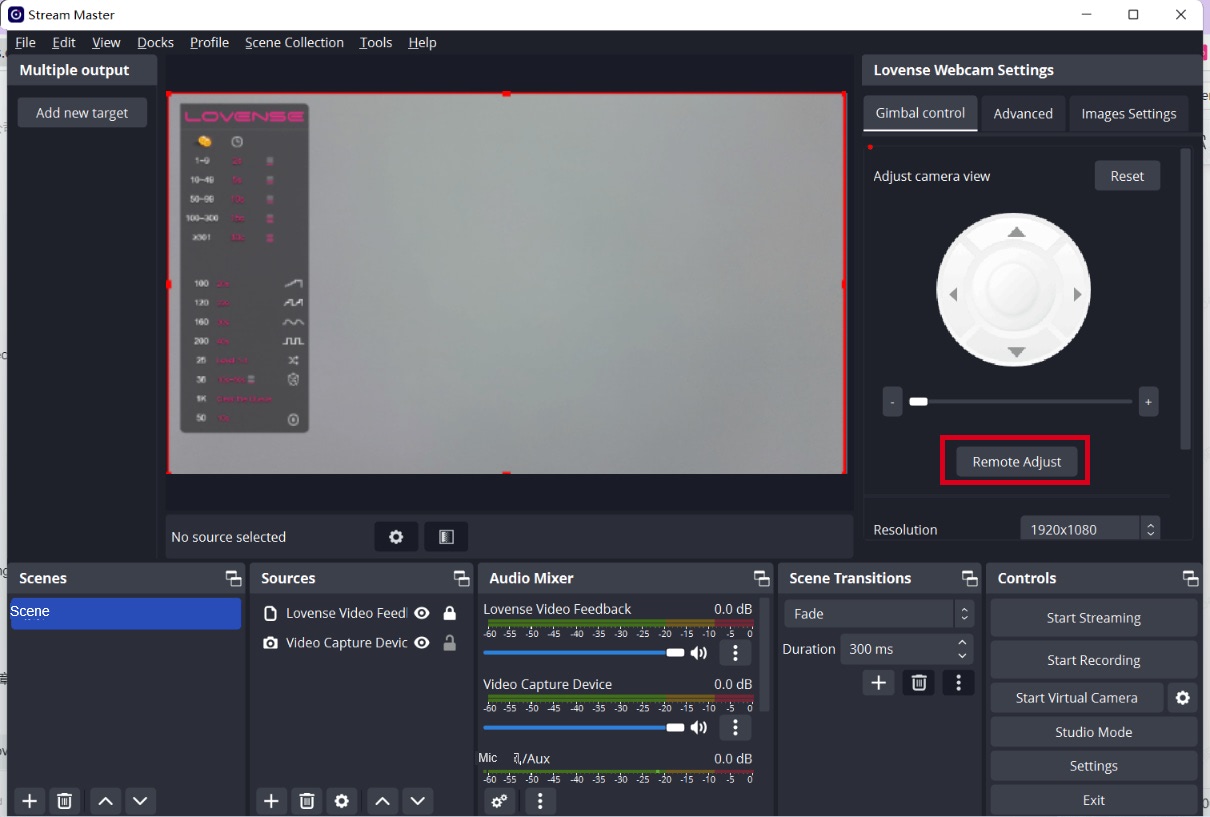

Scan the QR code with the Lovense Connect app (2.8.6 or newer for iOS and 3.0.2 or newer for Android) or Camera.
Please make sure your mobile and PC are on the same Wi-Fi network.

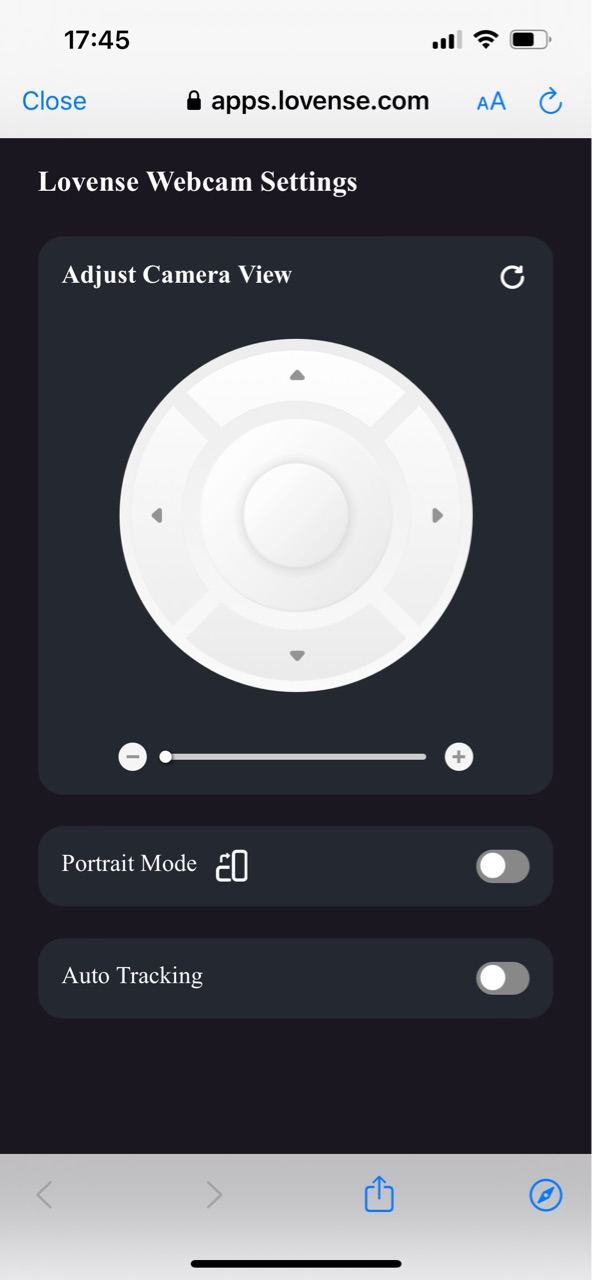
Open the remote adjust panel in the mobile browser.

Control the view of the camera (Up, Down, Left, Right).
Zoom in and out with the button.
Zoom in and out with gestures.
Show the changes in OBS.
Enable Portrait Mode and show the change in OBS.
Enable Auto Tracking.
Move your body slightly in front of the camera.
Let the camera follow your movement.
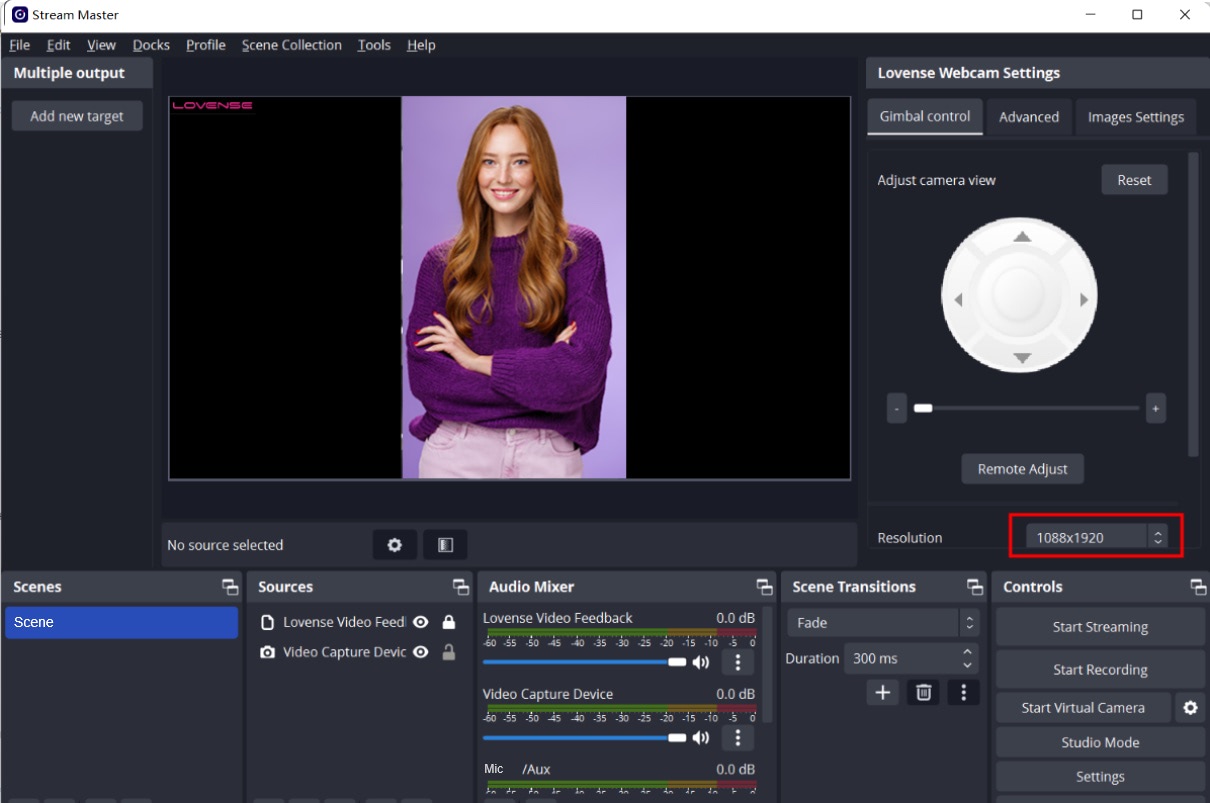
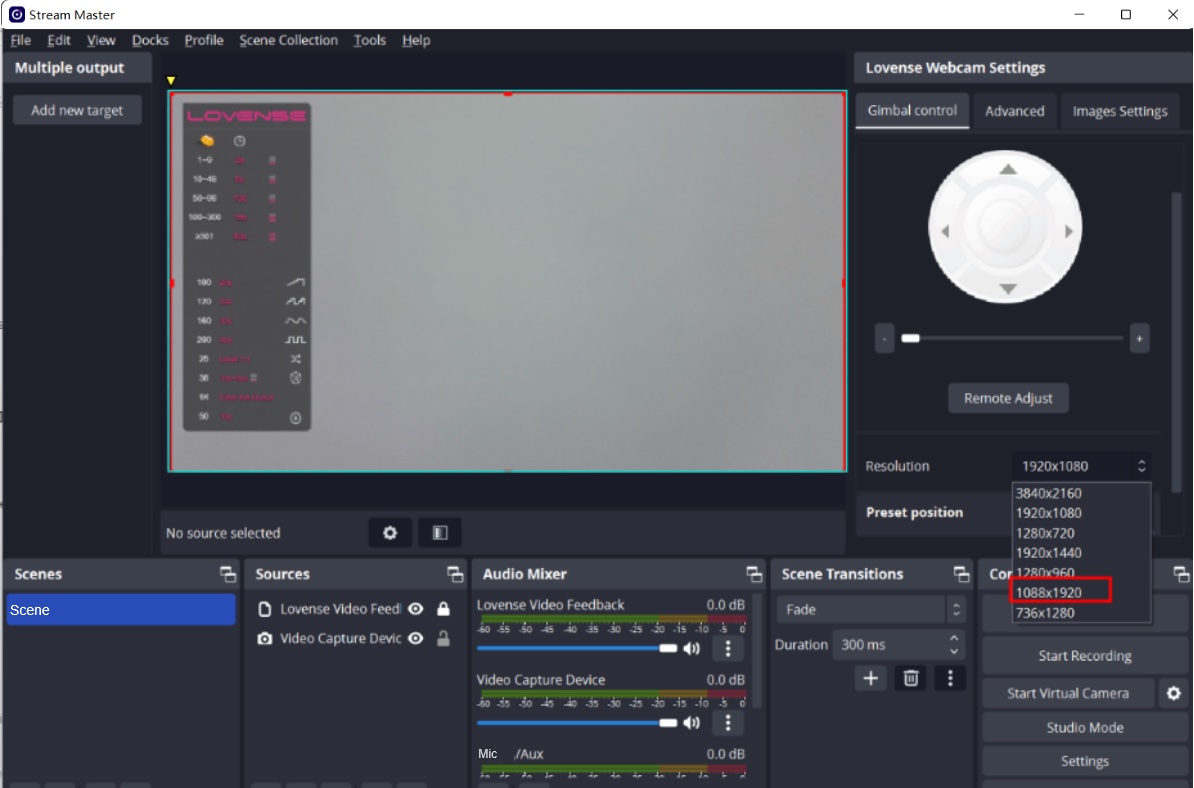
Portrait mode
Enable "Portrait Mode".
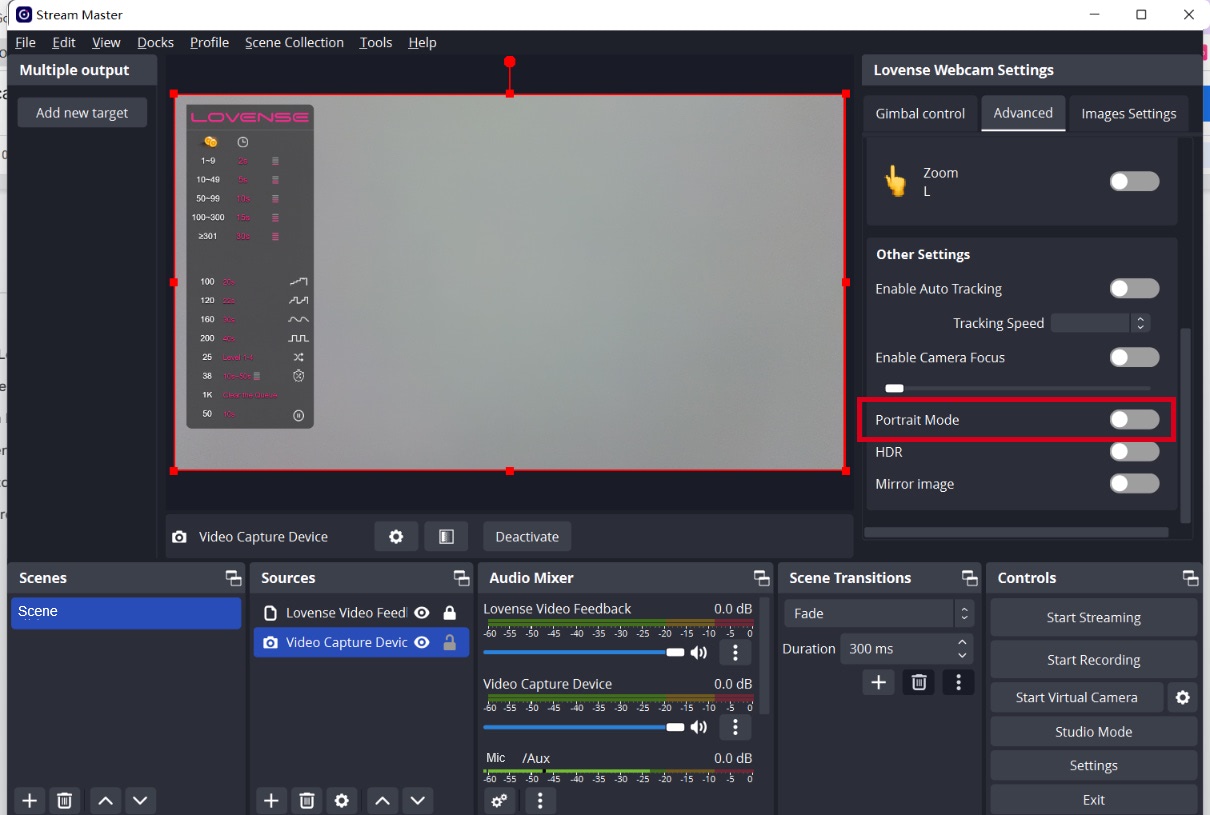
Choose a portrait resolution.


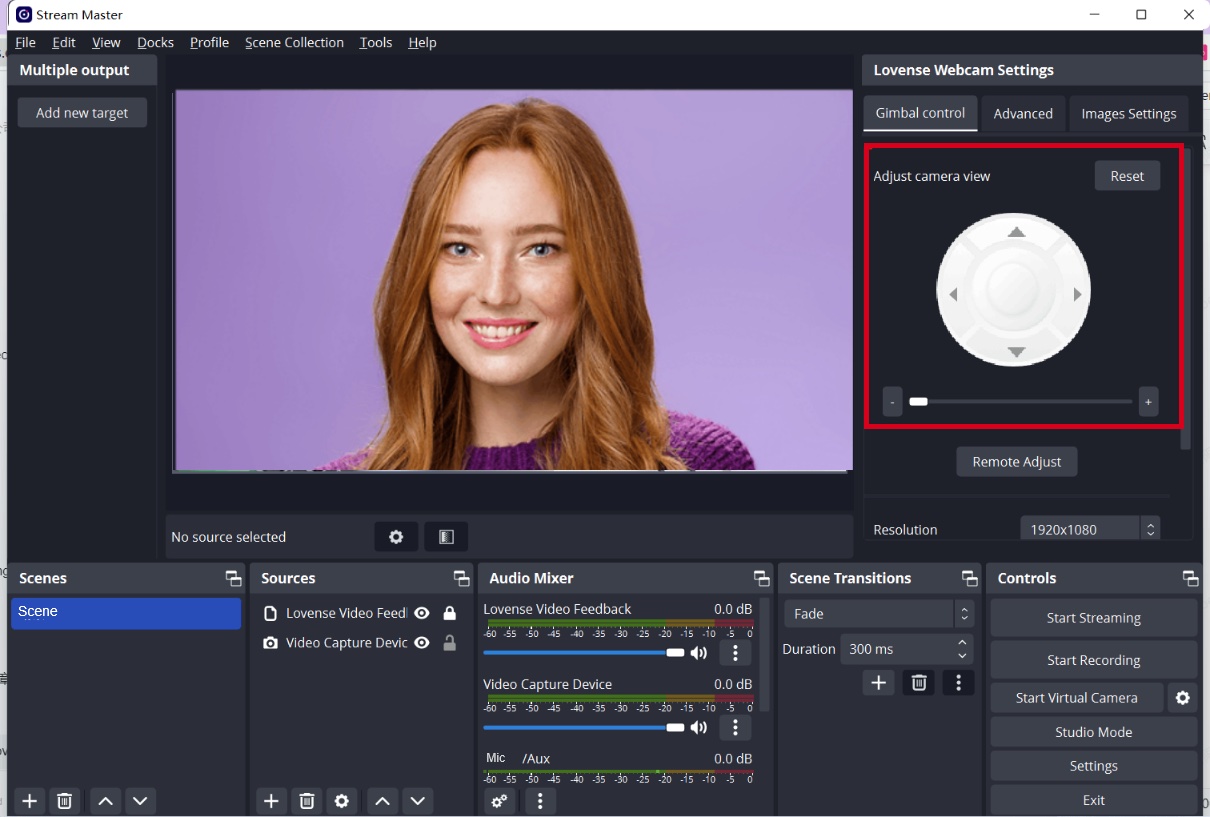
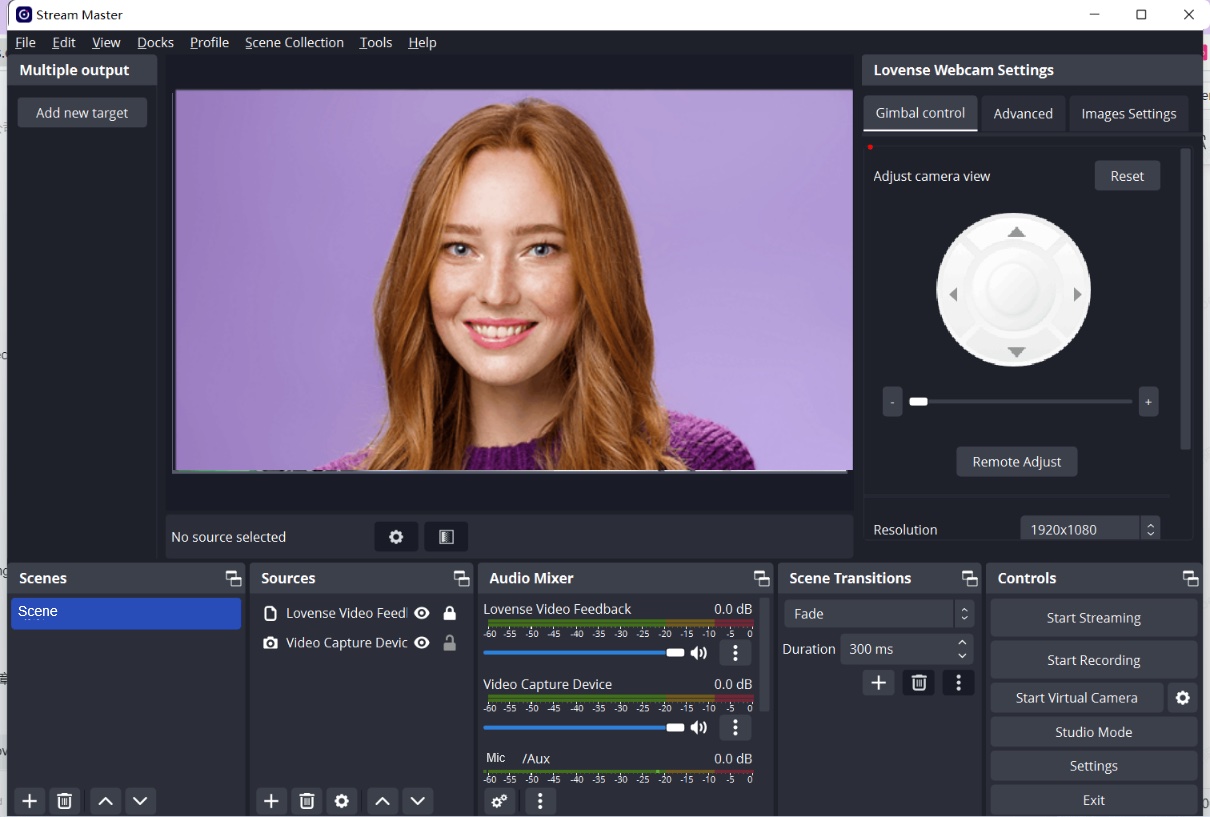
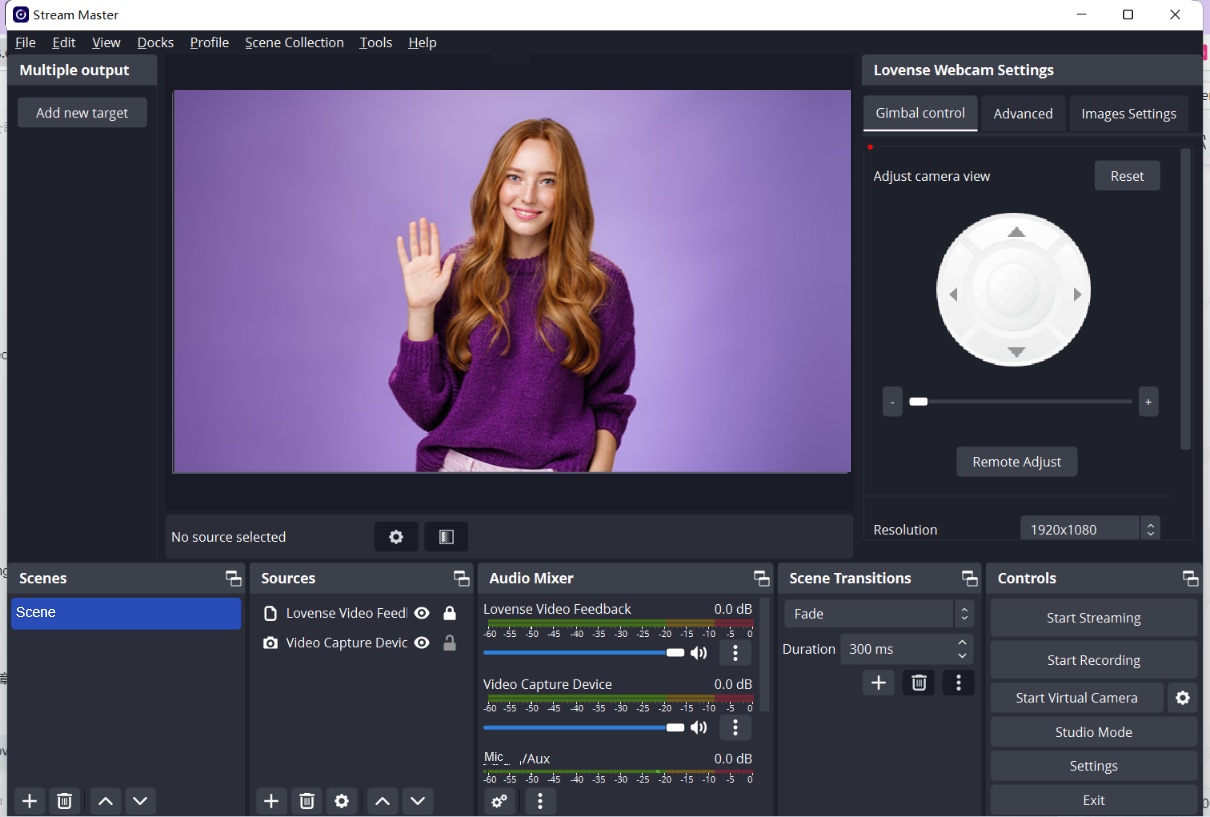
b) For Stream Master users
Set up


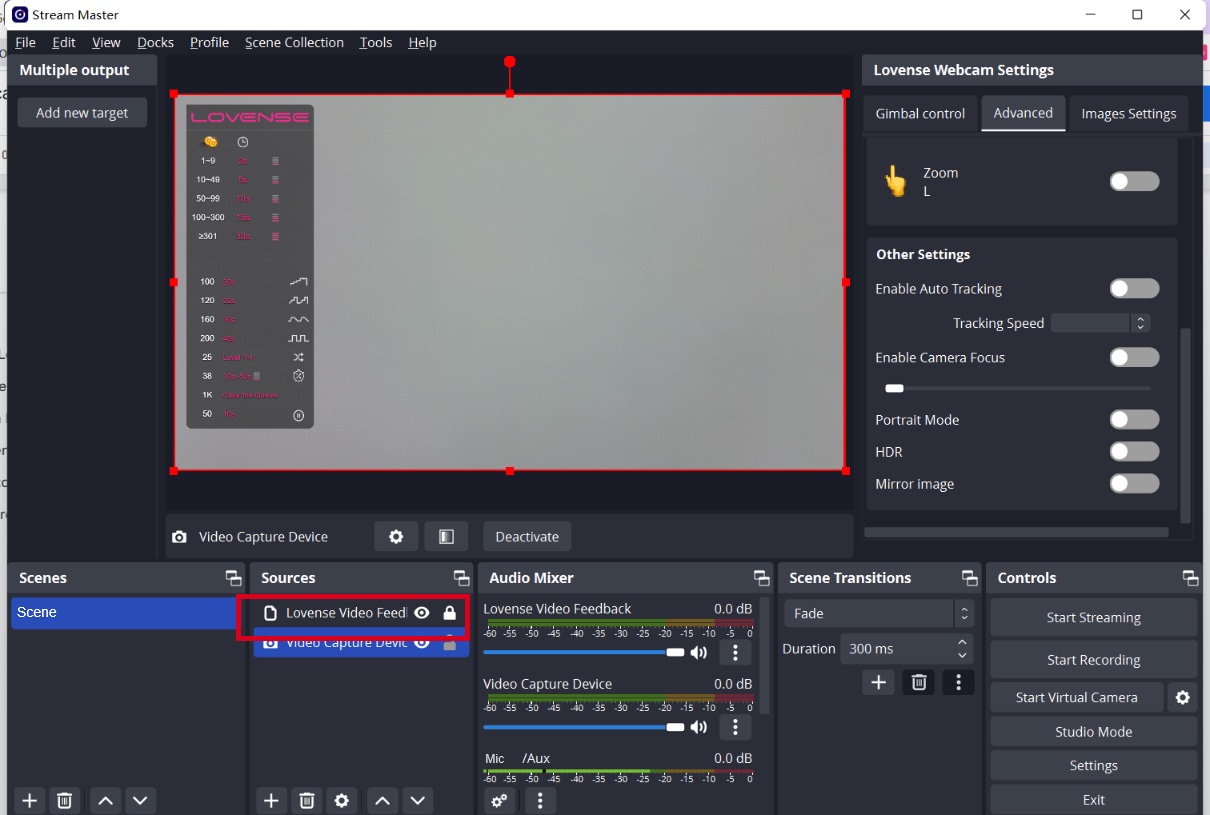
Adjust your angles
Gimbal control
Control the view of camera
Zoom in and out

Zoom in and out - L gesture
To zoom in:
To zoom out:
Set up tip-activated feature
Models can set up preset positions in OBS for different body parts and the tip amount and duration for each body part. Once tipped, the camera will zoom in on that body part.
Adjust the camera view.
Set a fixed camera view.
Add a new body part position you would like to be zoomed in on.
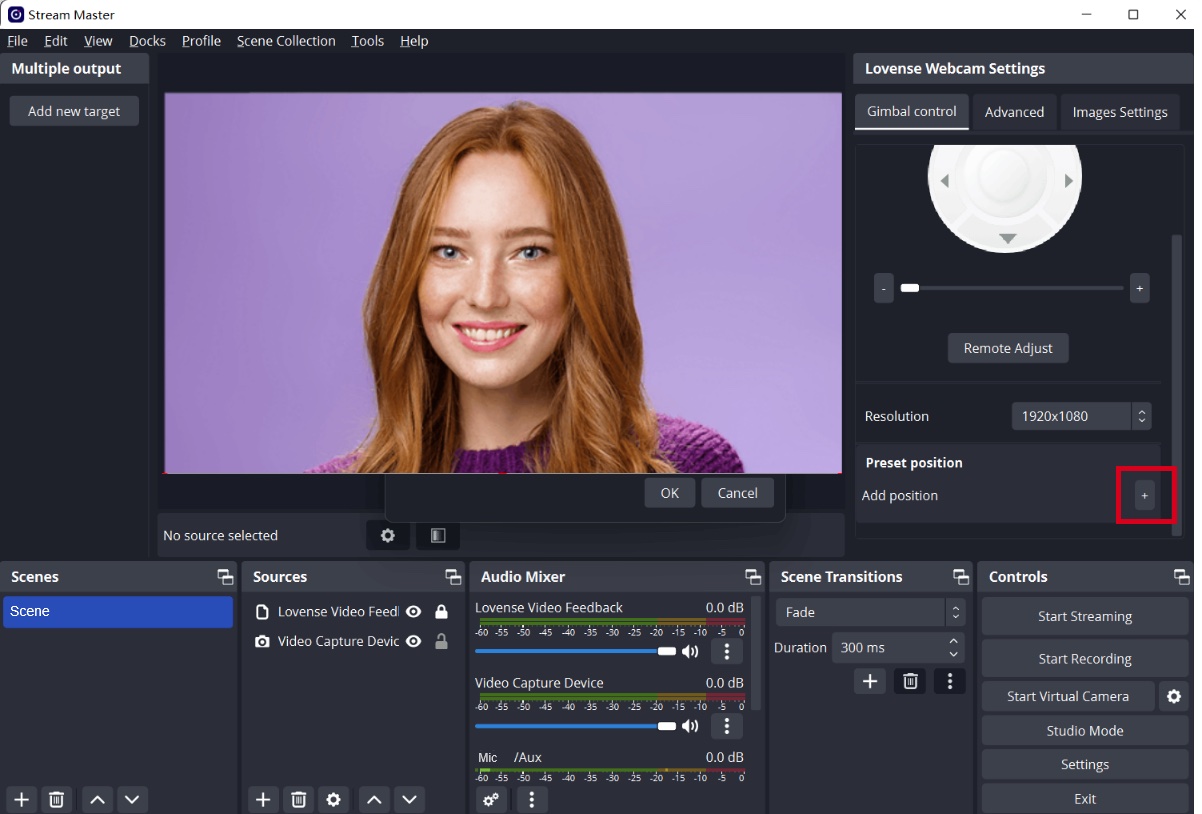
Set tip amount and duration for each body part being filmed.

Log into Stream Master
Go to the Stream Master’s settings page and log in
Send a test tip
Go to the broadcasting page and send a test tip in Lovense Widget to test if the preset position works.
The Lovense Webcam will switch to the preset position.
The view will change to its original position after the test tip duration is over.
Enable Auto tracking if needed
Button control
Stand up, walk away from the camera, walk to the left and right.
Enable "Auto tracking" with gesture, disable "Auto tracking" with gesture.
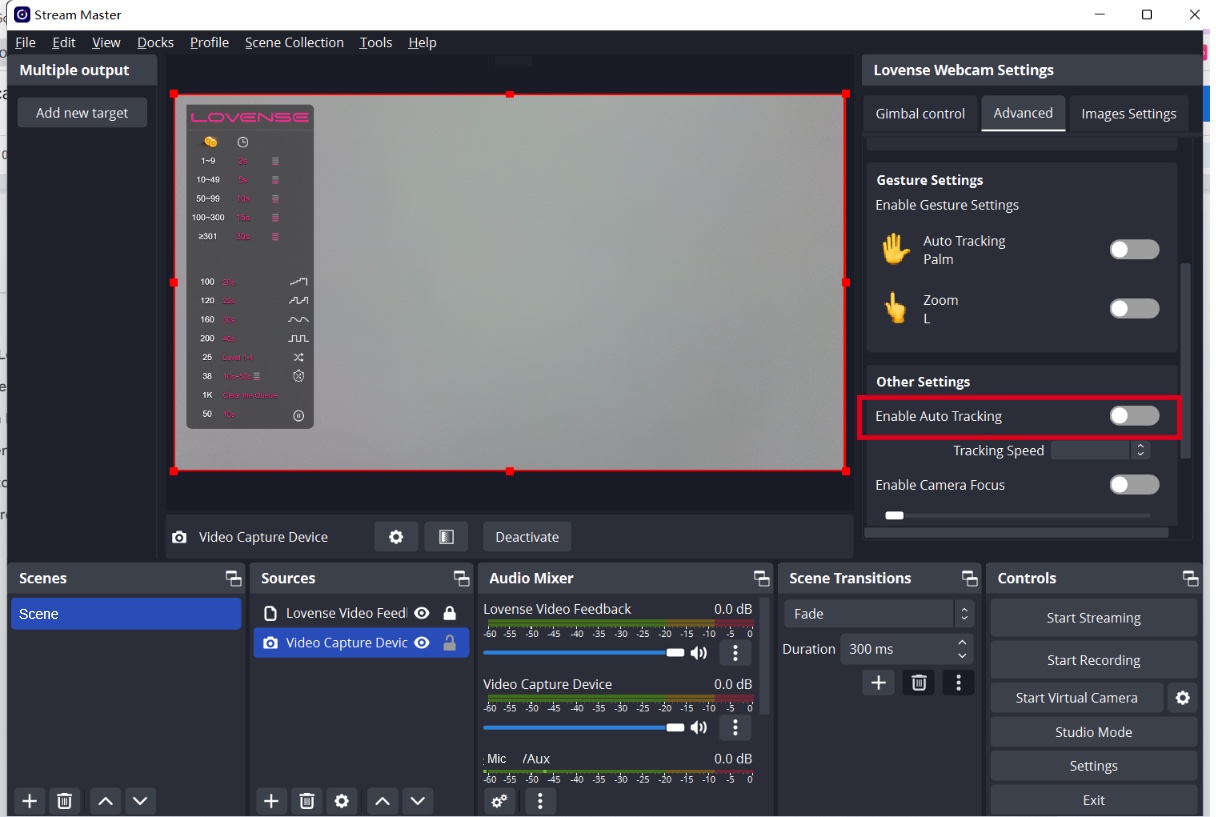
Enable AI Zoom and make different poses
Enable AI Zoom and make different poses
Your body will always stay in shot.
Whole body: Stand up and show your whole body in front of the camera.
Half-body: Sit on the chair and show your half body.
Head: Sit in front of the camera and make a cute expression.
Note: Whole body only works if there is enough distance between you and the camera.

You are now ready to go live!
You may want to use Gesture Control during the show
To enable "Auto Tracking":
Show your face and palm to the camera.
When the webcam light flashes, the "Auto Tracking" feature is enabled.
To disable "Auto Tracking":
Show the palm gesture again to disable “Auto Tracking".
Optional features
1. Remote adjust
If you move further away from your computer while broadcasting, you can control the Lovense Webcam using the "Remote Adjust" feature on your phone.
Open QR code of "Remote Adjust"
Scan the QR code with the Lovense Connect app (2.8.6 or newer for iOS and 3.0.2 or newer for Android) or Camera.
Please make sure your mobile and PC are on the same Wi-Fi network.
Open the remote adjust panel in the mobile browser.
Control the view of the camera (Up, Down, Left, Right).
Zoom in and out with the button.
Zoom in and out with gestures.
Show the changes in OBS.
Enable Portrait Mode and show the change in OBS.

Enable Auto Tracking.
Move your body slightly in front of the camera.
Let the camera follow your movement.
2. Portrait mode
Enable "Portrait Mode".
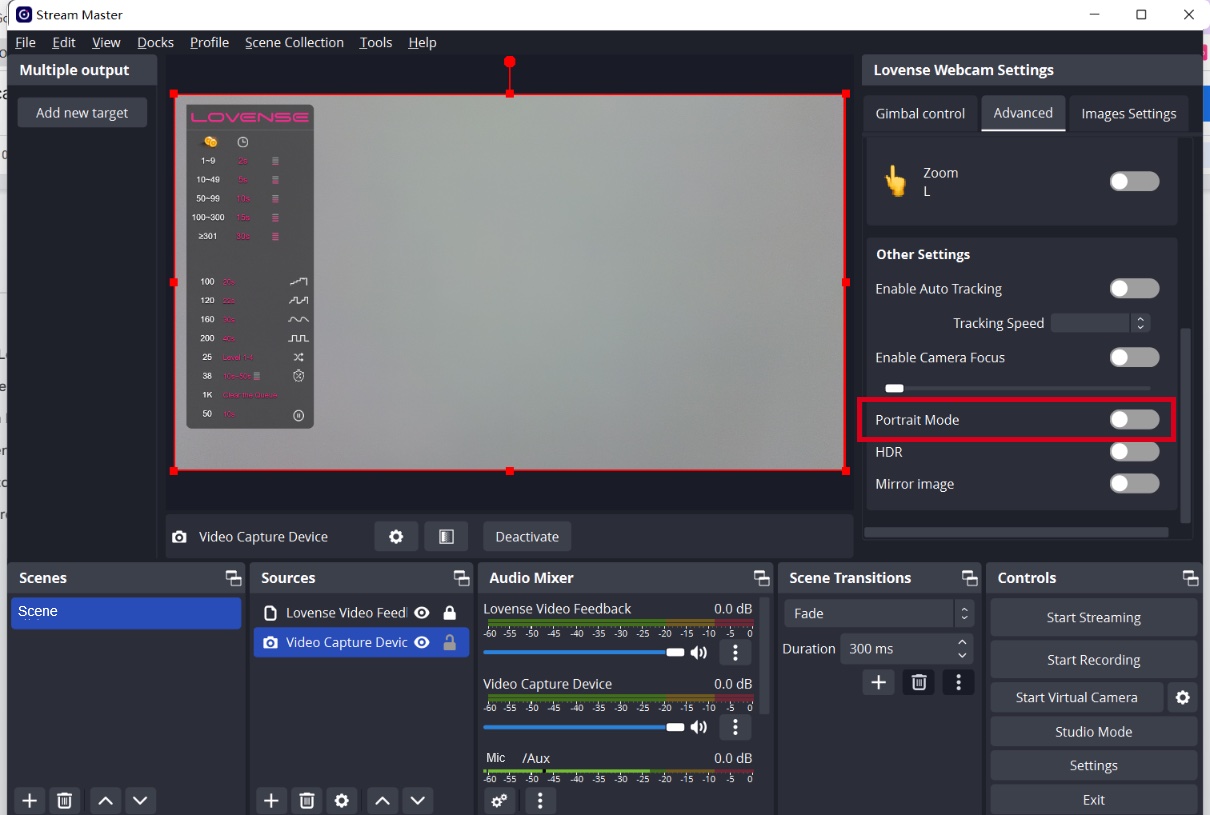
Choose a portrait resolution.

Stay in touch with your pleasure!
Sign up for our newsletter to never miss exclusive deals, new releases, and giveaways. You'll also get instant access to our free Lovense Pleasure Bible.
 Thanks for subscribing!
The email address is not valid. Please try again.
Thanks for subscribing!
The email address is not valid. Please try again.
You can unsubscribe at any time using the link in the newsletter. By clicking on the sign-up button, you agree to our Terms of Use and Privacy Policy.
Age Disclaimer
At LOVENSE, we are dedicated to providing a safe and responsible online environment for adults. We take our responsibility seriously and comply with all relevant regulations and guidelines.
All models featured on our website are 18 years or older. By accessing and using our site, you confirm that you are at least 18 years old and understand and accept the content on our site. If you experience any issues with our site, email our team at [email protected].
For information on the Custodian of Records required, please refer to our U.S.C. §2257 Compliance Notice.

Select Coupon
Not available
OFF
Applies to [toyname] only For orders over [amount] Valid till - [date] For orders over [amount] and new users only Collect Now Use Now Check Coupons Continue Shopping From [coupon activity name] campaign (CST) Expired Shop with Coupon Not available Buy with Coupon Apply Applied Code: Copy CodeCoupons not applicable to Christmas Gift Boxes,Lovense Webcam,Lovense Sex Machine, Lovense Mini Sex Machine,Gush2,Osci 3.
Lucky Buyer Discount

For your order over {0}
Expires in :
Coupons not applicable to Christmas Gift Boxes,Lovense Webcam,Lovense Sex Machine, Lovense Mini Sex Machine,Gush2,Osci 3.
My coupon(s)
Your order can't be automatically tracked because the sign-in email doesn't match.
How to resolve:
1. Visit 'My Orders'
2. Enter your order details manually
Missing your order number?
Contact UsFreebie
Black Friday
Toys recommended by your friends
Discount
For orders over {0}
Claim Coupon(s)
Check out this toy
Go shopping
Congratulations
Your friend give this coupon to you,hurry up and get your coupons!
Your friend just made an order, you get a coupon!
Sorry, you are late. The current coupon has been claimed by someone else.
Sorry, you are not eligible to receive coupons
Only new users are allowed to receive coupons
Your friend just made an order, you get {0} coupons!
Sorry, please check if your account is correct.
Go check account
You have already received the coupon, go use it now
You have successfully received the coupon, use it now
Please come back in {0} days
The current order does not meet the activity conditions of
"order received"
OK
Congratulations
The mystery prize will be sent out after the order is signed.
OK
Sorry, you didn't win the free order.
Explore more exclusive deals
Once the order is received, we will send your refund.
Once the order is received, we will send your refund.
Your friend has visited the website and you can receive a {0} coupon!
Coupons not applicable to Christmas Gift Boxes,Lovense Webcam,Lovense Sex Machine, Lovense Mini Sex Machine,Gush2,Osci 3.
You Got a {0} Coupon!
Email me a reminder before it expires!
Referral Link Unavailable
This link is expired. Please try another link.
OK
What You May Like
You can unsubscribe at any time using the link in the newsletter. By clicking on the sign-up button, you agree to our Terms of Use and Privacy Policy.
Submit
Enter your email
The Deeper,
The Stronger
60% OFF
New Mission 2
Equipped with depth sensors that intensify vibrations when deeper inserted.
Discover
Email Address
Code
If you encounter any issues, please email our team at [email protected]
We’ve detected a potential security issue with your account. To protect your data, please reset your password now.
You're already on the list! We'll notify you once the Lover Set is back in stock.
Unauthorized Domain
The domain you are currently visiting is NOT an official Lovense website.Please navigate directly to our official site: https://www.lovense.com
Copy Official LinkFREE shipping

We’d love your feedback
Take a quick 5-second survey, thank-you!
Start NowHow did you first hear about Lovense?
This order has been cancelled.
We will initiate a refund that should reach you within 7-10 working days.
This order has already been shipped out. You can’t cancel it now. Please contact us for further assistance.
For a better experience, we suggest you upgrade your browser or using other browser.